Menu
Table of contents
If you follow this plan, there is no chance of ruining the migration. And sit tight, because it really is a monster blog. Let's. Go.
Why this extensive article?
I started this article for two reasons:
- 1. There should be a manual for the staff of Online Marketing Agency #TEAMOMA.
- 2. Many blogs haunt the Internet about an SEO migration and you probably do not know which article you should or should not follow. Moreover, there are also very few really good Dutch articles about it.
So here is my solution: a blog on SEO migration available for free and for nothing.

One SEO migration is not the other
I see this article as the ultimate guide to SEO migrations. Only there is a big caveat to this: every SEO migration is unique.
Migration may differ in:
- Size (number of pages)
- Or you switch domains
- Or you switch from http to https
- Or you switch from www to without www.
So for that reason, it is important to connect someone to the project who has overseen many migrations. If someone has only ever done a small migration, it does not mean that someone can also handle a large migration.
So my number one piece of advice before you proceed is: look for someone who can dream the project below (and quite coincidentally, that's us ;)).
Then go through this process with that person. In case you have done an SEO migration yourself more often than not? Then feel free to get started with the list below.
Here's how to do an SEO migration
Important before you continue: roughly speaking, this article is divided into two parts. One part you need to pick up before going live and one part after. The first steps are all required before going live. I indicate in the article which steps take place after going live.
And now it is high time to describe all the steps.
1. Determine the URL structure of the new website (based on keywords)
This is one of the steps that is very often forgotten. This is because it is important to fully work out the structure of the website.
This step is so important because you, your client, the content specialist, the website builder and everyone working on the project will know exactly which page is where and should be placed where. So that this can never be discussed again.
You can do this first this way:
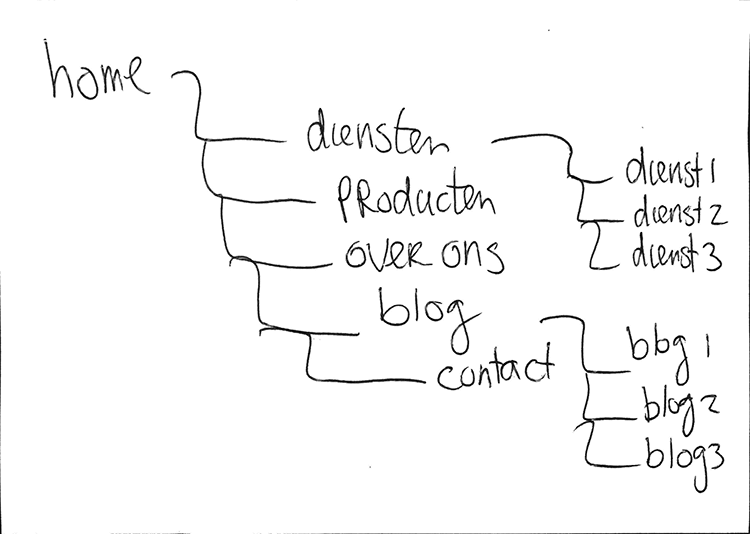
Then you can process this neatly in, say, an Excel.
In the structure, make sure that each page is named and possibly assign a keyword to each page in advance. Do this if the URL structure changes, but do this even if the URL structure does not change.
This step is also important because we are going to base the redirect overview (more on that later) on this structure.
It may not be very clear now what you have to do. And for that reason, I have an example of a completed structure for you. You'll find it below.
Example structure
2. Find out all the URLs of the current website.
If you did step 1 correctly, you don't know exactly what pages your website is going to consist of. Then, to determine the redirects, we first need to know what URLs your website now consists of.
I have three methods for that:
- 1. Screaming Frog
- 2. Site:jouwebsite.com
- 3. Your website's sitemap.
Screaming Frog is most important in this regard. Should you want to do an SEO migration, you should purchase this software. This is well worth it and is going to save you a lot of time. Screaming Frog is also very important after the migration.
Screaming Frog is a program that can crawl through your Web site like a Google (a crawler) to determine all your URLs.
Then you get a handy list of all the pages your website contains. And in addition to the list of URLs, you also get much more useful information: which pages are indexed, which pages are not, the meta description per page, the meta title per page and much more.
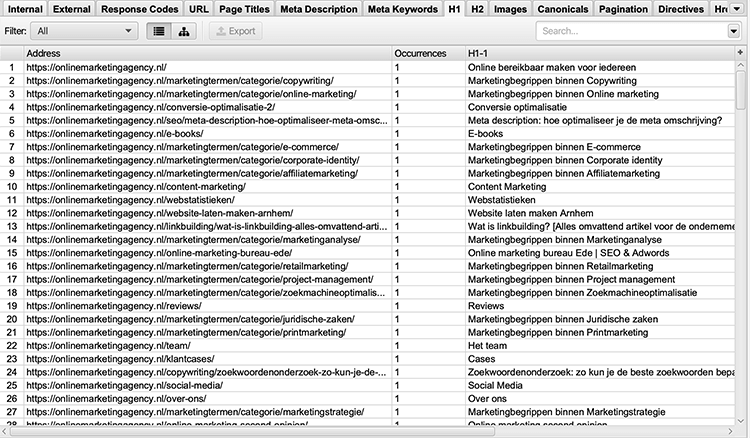
Above I have shared a screenshot of Screaming Frog. Should you want to know what such a Screaming Frog file looks like, you can download it here: Screaming Frog example
With the Search Operator site: you can see in Google exactly which pages are all indexed. This method only works for small websites, because it is a lot of work to copy all the links.

Your website's sitemap is also extremely important. There you will also find all the pages/URLs of your website. So you can get all the URLs from that as well.
3. List all redirects
This step is one of the most important steps of this article. Pay extreme attention during this stage.
You now have all the old URLs of your website and all the new URLs of your website listed. The need now is for you to "tie these together.
Just an example: on the old website, you had a page called /blog/seo-migration/. On the new website, the article is going to be called /blog/seo-migration/. In other words, the first URL needs to be redirected. List all these redirects in Excel.
In this file, put the old URLs in column A and the new URLs in column B. Be very methodical and cross a URL off your list of old URLs when you have processed it. Do not skip any URL and make sure that every URL has been processed.
The above example works only if your domain name remains the same. Should you go to a different domain name, in column A you will get the old URL. For example: onlinemarketingagecy.co.uk/blog/seo-migration/ and in column the new URL grandma.co.uk/blog/seo-migration/.

4. Transfer all content (including on page elements) to the new site, write new content and update existing content
If you go off some of the SEO migration blogs in Google, they often stop after step 3. Yes, they are three of the most important steps, but they are missing so much more.
What is very important next is that you are going to transfer all the content to the new website. On the URLs you determined in the previous steps.
Transfer images, text, videos all. Also be sure to include all On Page SEO elements. Consider:
- Intermediate headings(H1, H2, H3, etc.)
- Outbound internal and external links
- Structured data
- Images (name and alt text)
- Meta descriptions
- Meta titles
- Action buttons
- Yoast settings
Next, also make sure that all pages are as responsive as possible and include any structured data as well. This can be structured data that is on a specific page, such as the MultiFAQ, but also structured data that is site wide in the footer.
5. Back up the old site
The new website is as good as finished on the test domain. So now we are slowly moving toward going live, but we still have some things to sort out first.
Just before going live, make a backup of the old website. The moment you have made the backup, do not make any more changes to the old website. This will later prevent certain content from falling between the cracks or not including certain elements.
The backup is so important because you can always go back to the old site to see how things were there. Especially useful if the SEO migration accidentally goes awry.
Pro tip: if you have a WordPress website, there are plugins you can use to back it up very easily. For example, use All-In-One WP Migration for this.

6. Do a baseline measurement
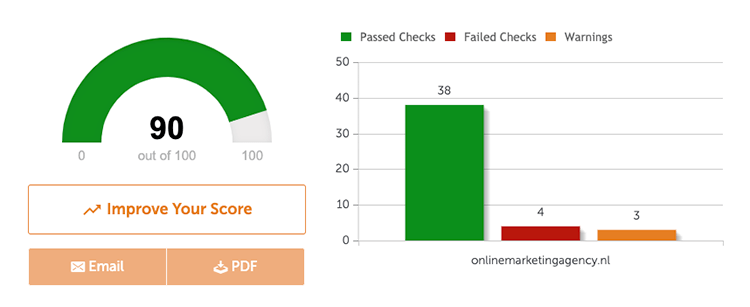
On the current website, you should also list and screenshot all important data. This ensures that you can look back afterwards to see exactly how things stood, should, for example, something go wrong or should you see a drop in visitor numbers after the migration.
Consider:
- Loading time
- Coverage errors within Google Search Console (so make sure the current website is provided with Google Search Console. How to do that I explain here.
- Number of indexed URLs
- Number of keywords on which you are findable
- Your top 100 highest-scoring pages
- Number of organic visitors per month
- Printout from Screaming Frog showing all URLs and On Page SEO elements
- Figures that SEO tools give about the technical state of your website (for example, SEMrush' s site audit or SEO Site Check Up).
- Screenshots from Hotjar or other conversion optimization tools
Make sure you collect as much valuable information as possible, so that you can retrieve this information with a few clicks. Don't think: I can easily see this in Analytics afterwards. Provide PDFs, screenshots and really save everything.
Especially when the SEO migration goes wrong and you do go and hire an outside specialist, this person can very easily see how you were doing.
7. Put the redirects in the new website
This is a simple step that I can't explain too much about. This is because it varies from CMS to CMS, from website to website and from website builder to website builder.
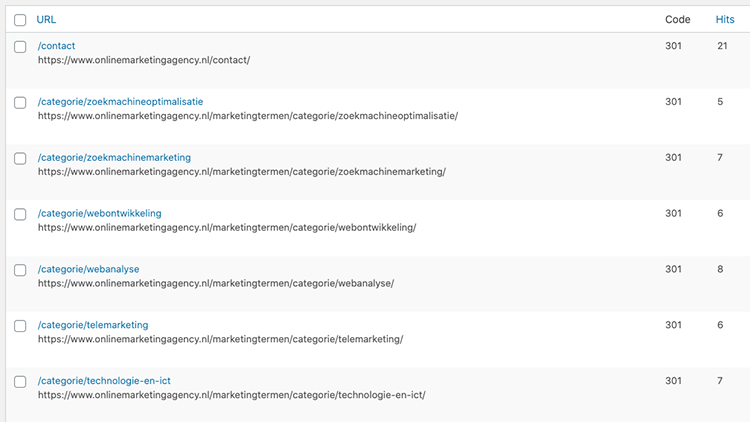
The redirects must be added to the new website. If you have a WordPress website, I recommend the Redirection plugin. In fact, I use it myself and it works very nicely.
With that plugin you do not need to have a special CSV file to upload the redirects in and within Redirections you can also create groups of redirects. Should you then have made a mistake, you can very easily delete the whole group.
If not WordPress, google how best to do this or ask your website builder.
In addition, make sure that all redirects are a 301 redirect! After all, that is the correct redirect that is needed. And also include all old redirects from the old website and check that no redirect chains (That's a redirect, to a redirect, to a redirect) are created.
8. Make sure all internal links are correct
If all goes well, you have already made some of the internal links correct. You had to do this when transferring the content. If an import and export was made that automatically transferred content, it is very important to go through all internal links.
Adjust all links according to the new link structure you came up with earlier during the SEO migration. Internal link building is not seen by many as an important part of SEO, but it does have quite an impact.
After all, if your most important pages do not have enough internal links, they will never rank well.
As a last check I advise you to use Screaming Frog again and for example an online broken link checker. It runs through your entire website and finds any broken links that you can then adjust.
You can, of course, use other tool for detecting broken links. Consider SEMrush or another program you're used to.

9. Test the new website extensively before going live
Click through the website, test your website on all types of browsers and devices, ask your neighbor to check it out, have your target audience test your website and so on.
In this step, it is important to subject the website to all tests. Review the technical state, analyze the speed of your website and check that all meta descriptions are in there.
Do everything you can to make sure the website is completely accurate and working.
Should your website be multilingual? Then also check that the hreflang tag is set properly. This is a tag that indicates which language a page is in.
10. Get a 404 page and optimize it
The 404 page is so important that I'm treating it separately for a moment.
When people click on an old and non-direct or broken link, they come out on this page. And when they come out on that page, you can see that reflected in Google Search Console.
When you see it back in Search Console, that means you can redirect that URL to make sure the 404 is resolved.
You can also often see these 404s in the redirect plugin you are using. If you don't have a WordPress website, you can also ask if your website builder builds or has something that allows you to see the 404s with it.

In addition, I also have some tips for the 404. Do not put here: 404 page - unfortunately, this link does not work (anymore).
Make the 404 page a party. Put a nice image here, add useful content such as important links and a search function, and do everything you can to help visitors as much as possible and make this experience as pleasant as possible.
After all, otherwise you're going to lose potential leads. Because no one wants to land on an unclear page where you can't move on.

11. Check that the URL structure is correct for the new website
Setting up the URL structure is often very easy for the SEO specialist or entrepreneur. They know what is needed and they know what all needs to be on the site.
Even though the structure is often very clear, it is still possible that the website builder may have done something wrong, missed something or perhaps made a mistake.
So always make sure you check the structure properly and check all URLs. That's the last thing you should do. Because.
It is now time for the website to go live. The button may be turned. The flag may go out. The LinkedIn post may go up in the air, the champagne may be drunk and you can start celebrating.
No sorry, that's not allowed (yet). There is work to be done first. Because the next steps are all about your organic findability and your SEO migration.
12. Analyze the number of internal links from the new website.
We go back to Screaming Frog again. And as I said, you can't do without this tool during a migration. In fact, within Screaming Frog you can also see how many internal links your pages have.
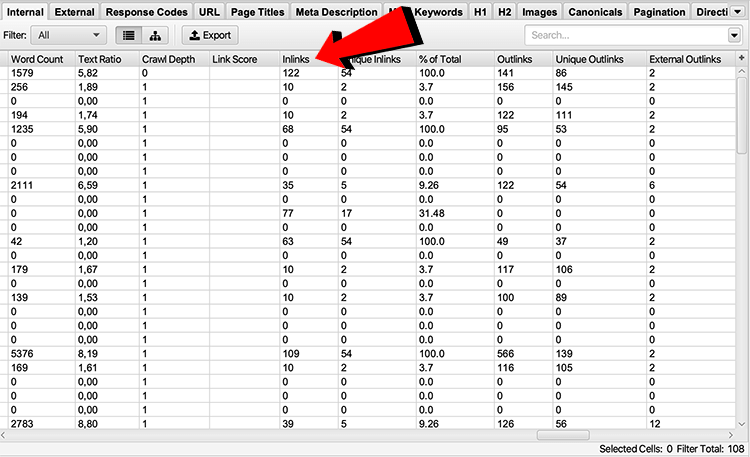
Check with Screaming Frog:
- Whether your most important pages still have so many internal links
- Whether the number of internal links has changed much
- Which pages have few internal links
- Which pages now possibly have a lot of internal links
- Whether everything still looks good.
Once you've checked that, it's imperative that you act on what you've seen. If necessary, add links, remove links or-if everything has remained virtually the same-go on to the next step.
13. Check robots.txt, htaccess, SSL certificate and noindex
The very biggest f*ck ups of an SEO migration that you can make are going to be looked at next. These are really the worst things that can happen to you. Because if something has gone wrong here, Google, for example, will no longer include your website in its indexing.
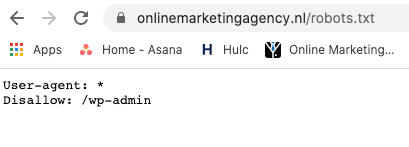
I think of the robots.txt as your website's manual and can be found by putting /robots.txt after your domain. It is important here that there is no disallow:/ anywhere. This is because if it is there, you are telling Google that all pages no longer need to be crawled.
Should you see nothing when you open the robots.txt URL, then you don't have a robots.txt. And that's also a problem.
Check the robots.txt properly and possibly google what is in your robots.txt (for example, copy the text and paste it into Google). Then you will quickly know if this is right or wrong.
Htaccess
The htaccess is a text file that allows you to control certain things within your Web site. It is very often called a configuration file.
This is where your redirects are placed, this is where you give the redirect from http to https, this is where everything about your cache settings and more. In short, this is an extremely important file.
There can be dozens of lines in the htaccess, so a lot can go wrong here. Unfortunately, therefore, I cannot say: check X or check Y. Have your SEO specialist or your website builder check this file properly.
SSL certificate
Meanwhile, having HTTPS is a Google ranking factor and when a website does not have an SSL certificate, your visitors will see a notification that your website is not secure.
So besides having a negative impact on your SEO, it is also extremely bad for your conversion rate. In fact, the bulk of visitors will leave immediately.
An SSL certificate can be requested from your hosting party and must then be installed. Although it is increasingly common for hosting parties to arrange this for you by default.
Noindex
The famous noindex. This is the single biggest mistake you can make in an SEO migration. If you leave the noindex on the website on, no page will be indexed.
That means you will lose positions in Google, new URLs will not be included, and it has many other negative consequences.
Checking the noindex is done as follows:
- Open the website in Google Chrome
- Click your right mouse button and then 'Show page source'
- Click CMF+F on iOS and ctrl+F on Windows and search for noindex
Didn't find anything? Then you're fine. Do you see noindex in your source code? Then you have a problem and you should remove it as soon as possible.
14. List the website in Google Search Console and Bing Webmasters
Google Search Console is a program that gives you a little power over the indexation of your website in Google. Since your website is just new, you naturally want Google to include it in its indexing right away.
This may, if you don't force it, take a few days to a few weeks.
If you listened to me carefully, you also added Google Search Console to the old website. After all, that was a requirement.
When you go to your website within Search Console, you can submit a new URL to Google at the top. Put in the full URL of your homepage here, hit enter and then "request indexing.
Google then goes through your homepage (and all the pages linked to your homepage) and will re-rate it. That's why it's so important that your internal link structure is correct.
Should you have some extremely important pages that generate a lot of traffic, re-bid them separately. That way you can be sure that they will be indexed as well.
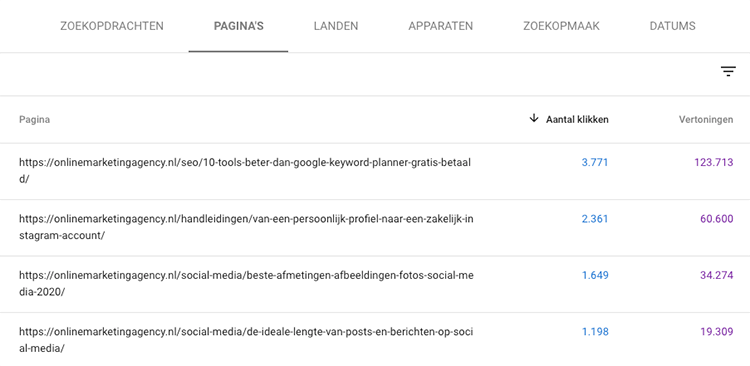
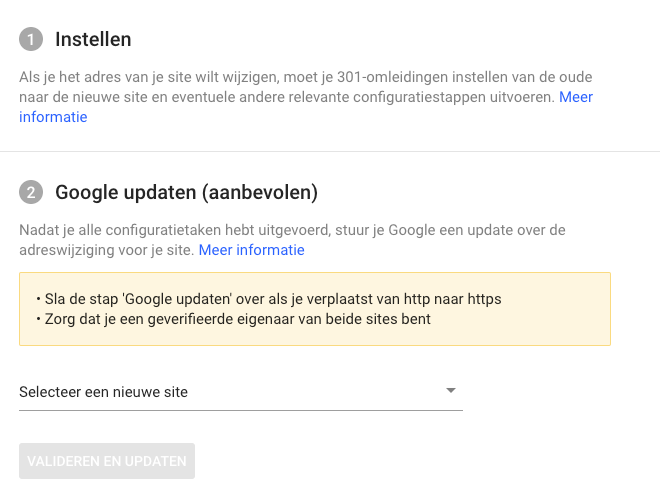
The above works only if you do not change your domain. Should your domain name change, you must also report the address change within Search Console.
You can do that by clicking on "settings" at the bottom left and then "change of address.
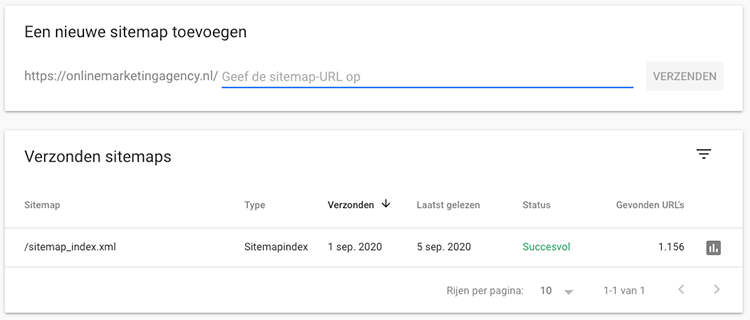
15. Offer the sitemap in Google Search Console
The sitemap is the floor plan of your website. When you provide it to Google, Google has a better idea of how your website is put together and Google knows better how to send its crawler through your website.
Your new website needs a sitemap and you also need to submit it to Google to boost your SEO migration. Again, you do this in Google Search Console.
You can do this by clicking on "Sitemaps" on the left in Search Console. Then enter the URL of your sitemap there. This is often /sitemap.xml or if you have a WordPress website and are using Yoast it is /sitemap_index.xml.
Enter the URL of your sitemap and then click 'submit'. That's all you have to do!
16. Monitor the number of pages indexed and check your top 100 pages
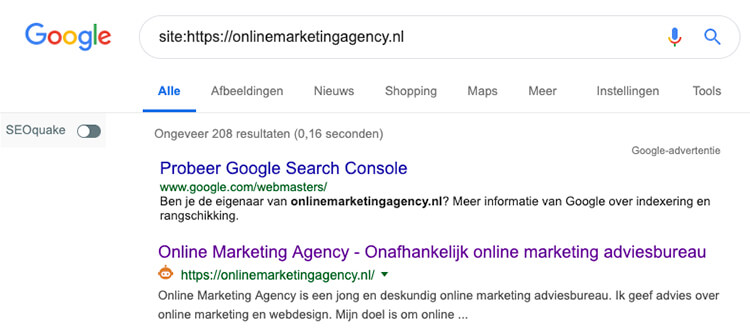
Once the website has been indexed with the new URL structure, it is important that you start looking at the number of pages indexed with site:yourwebsite.co.uk in Google.
In fact, this number should roughly match the number of URLs in the structure you created. It should not be the case that the website contains 12,000 URLs while you have 300 in your structure. Then something went wrong somewhere and a lot of automatic pages are generated, for example.
We shouldn't have that...
Next, it's smart to also manually check the top 50 or top 100 pages. By top 100 pages, I mean the 100 pages that Google Analytics says attract the most visitors organically.
As it happens, the top 100 often provide the vast majority of visitors, so if they are really good, you have a lot less to worry about.
So go to Analytics and find out your 100 highest-scoring pages. Then check if:
- The page still exists
- The content is properly transferred (text, as well as the meta title and meta description
- Any redirect works and is correct.
17. Fully test the live website
There is almost no chance that something about your website is not working properly or not correct. After all, you have tested the website in various test environments and have already checked many things.
If you had come across something, you would certainly have reported it to your website builder. What I still sometimes see going wrong is that some functionality doesn't work properly after all.
A search function, for example. Or something like a self-developed feature that's in the footer. Those little things you often forget to test.
Do that again in this step, and again ask to have an outsider look at the website.
18. View Analytics, 404's Search Console, your positions and more
Beforehand, you did the baseline measurement: a check/drawout of all the important tools you use. In the days after going live, you need to check all these things daily to see if all went well.
See how your positions in Google are doing, look at the traffic to your website, monitor 404s very closely and check your SEO tools such as SEMrush or Mangools.
Monitor everything and act immediately if you see something striking. Are you suddenly in spot 15 while you are always in the top 3? Check what could be causing it! Is the number of organic visitors down 30%? Do something about it!

19. Adjust your Google Ads campaigns, your scripts, conversions and other edge cases
When your new website is up, you should also check all the scripts, Google Ads campaigns, conversion tracking and other peripherals and adjust them as needed.
This is because your old URLs have changed and you need to change this everywhere. Also think about your Hotjar and thank you pages.
Run through everything and test if it still works. Very logical, yet often forgotten.
20. Contact all backlink partners
Of course, you've redirected everything nicely and so the value of the links is also redirected nicely. But your new website and new URL structure are going to rank even better when the new URLs also get backlinks.
You can of course amass or buy new backlinks, but you can ask the current websites that link to you if they would like to change the links to the new URL.
This is time-consuming, but is going to ensure that your SEO migration has even more impact. Using SEMrush or Ahrefs, for example, create a printout of your backlinks. Then contact everyone still linking to the old URL if they want to update it.
And voila. Very simple, but very effective.

21. Do a complete SEO audit
If you have completed the above steps properly, then this step is not necessarily necessary. We always do it, though. We do a complete SEO audit and make a full report of it.
This way we know exactly where the opportunities are now, what went well and what still needs to be worked on. We also call this SEO audit an SEO scan and it is performed by someone from team OMA who has not been involved in the migration.
This prevents you from not seeing a problem through tunnel vision. Since the SEO scan is an important product for us and is 100% self-composed, I can't share it with you.
Should you still want us to pick those up for you, please contact us.
Bonus: common mistakes in an SEO migration
Some of these mistakes have already been mentioned in the article. Still, I want to give you a handy list that you can go through like a checklist:
- Noindex are on
- Disallow is in the robots.txt
- Redirects not added or forgotten
- Old redirects are not carried over to the new website
- Redirect chains due to redirects pointing to each other
- No redirect from http to https
- Forgetting the canonical
- Scripts are not adopted
- Internal links that are forgotten
- Not knowing the importance of advance analysis
- Forgot to provide the sitemap
- Doing the migration without Screaming Frog or without Google Search Console
- Doing the whole migration yourself without the presence of someone experienced with it
- Not following this whole roadmap :).


Written by: Daniel Kuipers
Daniel is the founder of Online Marketing Agency. He constantly scours the Internet for the latest gadgets and tactics and blogs about them in understandable language. Well, sometimes.