Menu
Table of contents
Because that action button on your home page, do people even click that?
The new form on your website, do people see it?
And do people scroll to the footer of your website where visitors can sign up for the newsletter?
You don't know, but with Hotjar you'll find out!
After giving you some more information about Hotjar, I'll tell you how to install Hotjar through Google Tag Manager.

The three most important features of Hotjar that you can do something with
Hotjar, like almost every other tool, has many features.
Both paid and free.
But to be perfectly honest, I don't think it's necessary for you to take a paid account.
There are two reasons for this:
- You (probably) have no more than 2000 page views per day
- You (probably) don't have the time to test 15 pages
Just a clarification:
The free version of Hotjar allows you to gain insight into your page visits up to 2,000 page views per day.
That's really a lot.
I don't think you'll get there.
Besides, you don't have all the time in the world either, so you can probably only test 1 or 2 pages at a time.
And that, fortunately, fits right within the free package.
Surely you have more than 2,000 page views per day?
Then go for the plus package within the heading 'Personal'!

Back to functionalities.
Hotjar has three essential functionalities you should know about:
- Heatmaps
- Visitor recordings
- Form Analysis
For each section, I am now going to explain to you what you need to know about it.
Click, motion and scroll heatmaps
With a heatmap, you can see exactly where visitors' attention is drawn within your website.
This is then represented by colors.
The color red is used where the most attention is drawn and the color blue where the least attention is drawn.
Within Hotjar, there are three different heatmaps available:
- Heatmap to find out where people are clicking
- Heatmap to find out where people move their mouse
- Heatmap to find out to where people scroll.
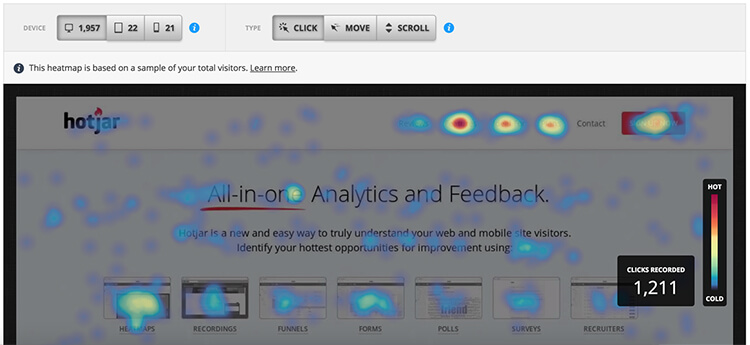
If you click on this you can go to the heatmap of my homepage. Then at the top you can select which device and type of heatmap you want to see.
Click heatmap and what can you do with it?
I find the click heatmap by far the most interesting.
After all, you can see exactly what people are clicking on ...
And also especially what they don't click on.
For example, I found out through Hotjar that many people were clicking on the reviews at the bottom of my footer.
Check it out!
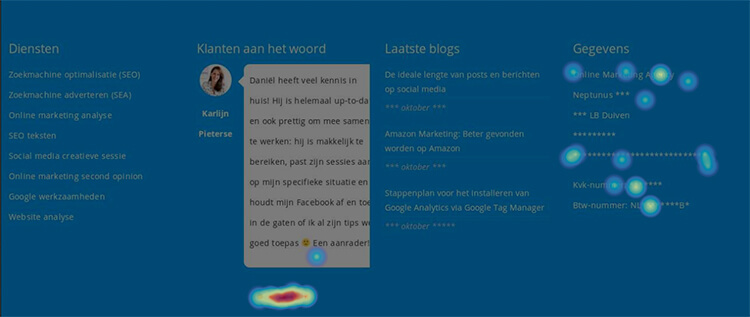
The red color indicates frequent clicking on spot.
So what does that mean?
The reviews should be moved to the top and not just shown at the bottom of the website.
Maybe I should even emphasize reviews more.
Because the very reviews get the most clicks.
In other words, with the click heatmap, you can see what visitors find most interesting within your website.
Movement heatmap and what can you do with it?
With this heatmap, you can see exactly how visitors on your website moved their mouse.
Of course, this can only be measured on desktop (why I hope I don't have to explain to you).
You can also infer things from this data.
Because suppose: you've added a new feature to your website.
With the motion heatmap, you can then test whether this component stands out and is seen at all.
You can then immediately see where visitors have drawn the most attention.
And a motion heatmap then looks like this:

Scroll heatmap and what can you do with it?
The last type of heatmap within Hotjar is the scroll heatmap.
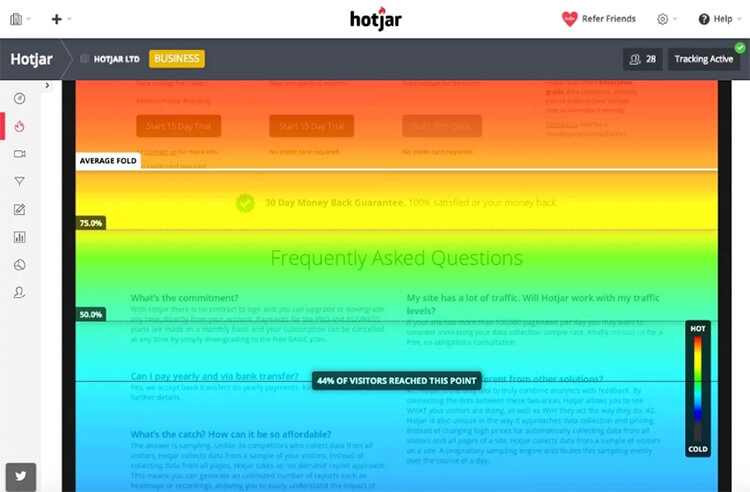
With this heatmap, you can see exactly how far your visitors are scrolling.
Is that a little clear?
What I mean to say is that you can see exactly how many visitors have scrolled to a particular spot inside a web page.
Again, what you can take from this is that you should not put important information in the places where the least of the visitors come.
So exactly what I had done with my reviews.
Because those reviews were by far the most clicked, but at the same time were also seen by only a small percentage of my visitors.
A scrolling heatmap looks like this:
Recordings within Hotjar
So, we are 500 words later and I have only explained one of the three most important features of Hotjar.
Fast forward to numero dos: Recordings.
A recording is nothing but a recording.
A recording of a visitor's visit to your website.
Terribly useful because you can see exactly how people are using your website.
The free version of Hotjar allows you to record 300 recordings.
After 300 recordings, you can delete them and thus have room for new recordings.
Exporting a recording unfortunately does not allow Hotjar, but with some sleight of hand it kind of worked.
See a recording here!
Now I hear you thinking: what can I do with this recording?
You can use the recording to see exactly how people behave within your website.
You can see where they drop out, where their attention is focused and what all they are doing.
I find this especially helpful because I often have tunnel vision when it comes to my website.
And this recording allows me to step outside the tunnel vision and see how a visitor really behaves (and not how I think they behave).
Form Analysis
Forms can be daunting.
But options within a form can also be daunting.
With Hotjar's form analysis tool, you can see exactly at which part people drop out.
Analyzing my form, I saw that almost everyone filled in their name, email address, phone and subject.
I also noticed that the bulk dropped out when completing the message.
But what can I do with this information now?
When this blog is live I have removed the message section and that should increase the number of messages I get in.
Hotjar can do this with any form and thus also with the form on your website.
So it could just be that by removing or adding an option you are going to get more requests per month.

By now you are hopefully convinced that you should have Hotjar to optimize your website.
Whether you are just starting your business, you have been in business for a year or if you have been in business for 10 years.
Hotjar is always an asset!
Now let's get right to the point: I'm going to explain to you how to install Hotjar!
Installing Hotjar via Google Tag Manager
In another blog, I already told you how to create a Google Tag Manager account and how to add a Google Tag Manager script to your website.
So I'm not going to explain that again.
So click here and perform step 2 and step 3!
If you don't, you can't move forward.
Lekker puh.
Create Hotjar account
Now that Google Tag Manager is working we move on to Hotjar, where we will now create an account.
You do this as follows:
- Go to the Hotjar website
- Click on 'Try it Free' at the top right.
- Enter your name and email address or log in with a Google account
- Create a password
- Enter your job title and organization name.
- Enter the URL of your website and the type of website
- Go through the first two steps to turn on recordings and turn on heatmaps.
Your Hotjar account has been created!
If you have completed the first two steps of the pop-up screen, then the recordings are on and the heatmap is also on for one URL.
One page, that is.
Within Hotjar's free account, you can have three heatmaps on at once.
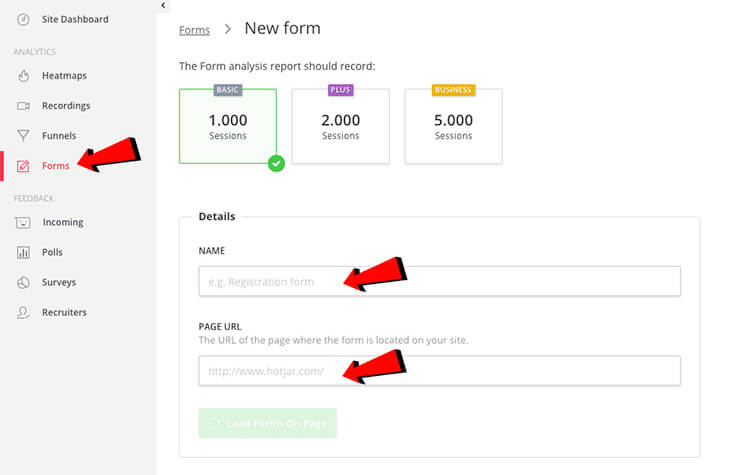
You now just need to click on 'Forms' on the left within Hotjar and complete the information so that your forms are also measured.
You can find that info in the screenshot below.
Link Hotjar to your website via Google Tag Manager
Hotjar itself explained perfectly how to link with Google Tag Manager.
Includes helpful photo and some short steps.
Since I'm still convinced that I can explain it just a little better, I'm going to do that.
Step 1: Find out Site ID.
Within Hotjar, click on 'Site Dashboard' at the top left and then look for the 'Site ID' at the bottom right.
Copy or write down this Site ID.
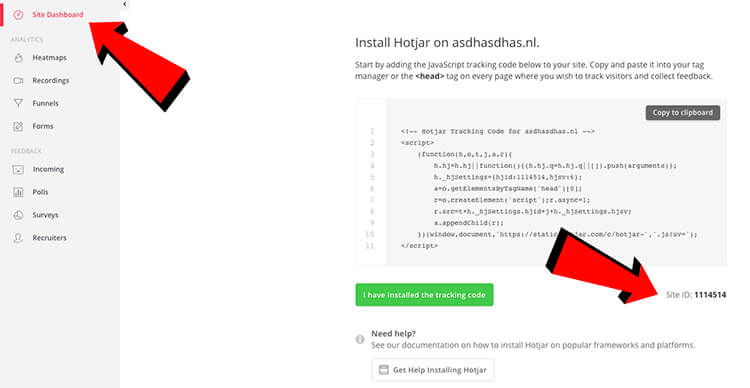
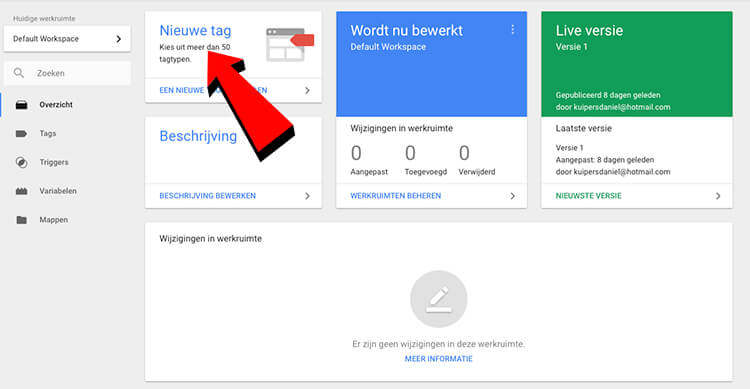
Step 2: Add a new tag
Within Google Tag manager, click on "Add a new tag.
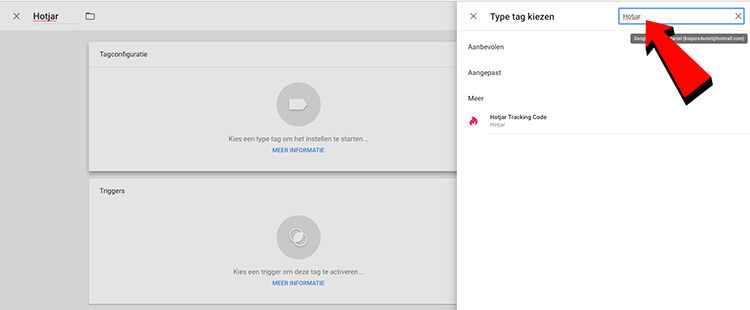
Step 3: Configure tag
First, give this tag the name "Hotjar" by entering it in the upper left corner.
Then click on "Tag Configuration" and search for "Hotjar.
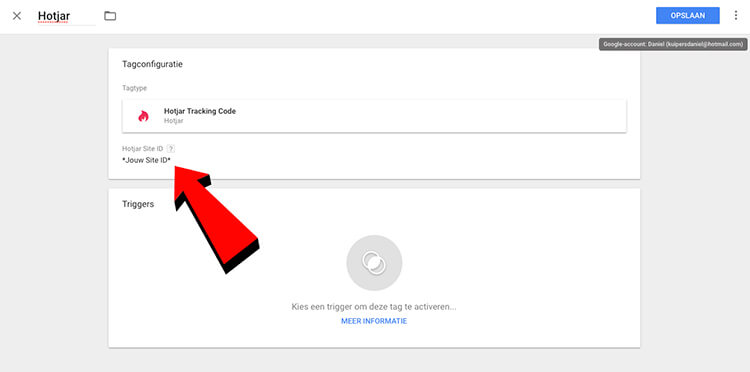
Step 4: Add Site ID
Click on 'Hotjar Tracking Code' then enter the Site ID you found out in step 1.
Step 5: Add trigger
Now that Hotjar is properly added, we just need to add the trigger so that the code is also triggered within the website.
Click on "Triggers," then "All Pages," then click save in the upper right corner.
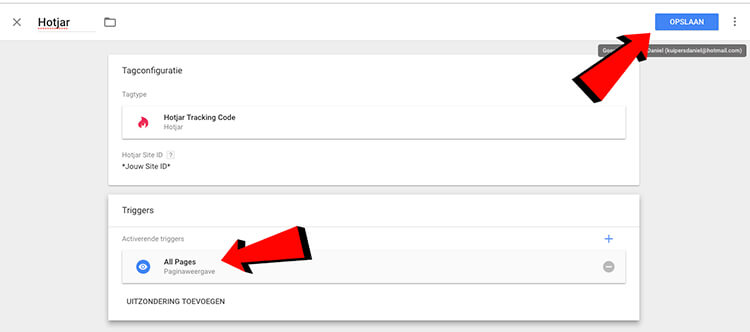
Step 6: Submit
Now that everything is set up correctly, all you need to do is click on send in the upper right corner and then on publish.
Then your Hotjar script is live!
But.
We do need to double check that you did it right.
Next to the "Submit" button is a button marked "Preview.
Clicking that button activates Google Tag Manager's preview mode.
Then, to really test if your Hotjar script is working, you need to go to your website and reload page.
Then, if all goes well, a Google Tag Manager preview will appear at the bottom of your website where you should see the following image:

If you see those, you've done well!
The preview mode of Google Tag Manager you will continue to see, therefore you have to turn it off afterwards.
You do this by clicking "Close preview mode.
So what!?
Adding Hotjar is that easy.
Now all you have to do is wait for Hotjar to collect data so you can analyze the data and optimize your website.
Did you not succeed?
Then just click on this link and I'll help you out.
What are the main features of Hotjar?
Heatmaps
Visitor recordings
Form Analysis
What are Hotjar heatmaps?
Heatmaps visually show where visitors click or move on a Web site, providing insight into their behavior and preferences.
What are visitor recordings from hotjar?
Visitor recordings from Hotjar are video recordings of users' actual behavior on a website. These recordings show how visitors navigate, click and scroll. Through this tool, website owners can gain insight into the user experience and identify any pain points.


Written by: Daniel Kuipers
Daniel is the founder of Online Marketing Agency. He constantly scours the Internet for the latest gadgets and tactics and blogs about them in understandable language. Well, sometimes.