Menu
Table of contents
Before we begin: e-commerce tracking explained
The basis of a good online marketing strategy are of course clear goals and insightful numbers. Within your B2B website, for example, you can make your quotation requests and the clicks on the phone number measurable, but within your webshop it is of course about orders and rock-solid turnover.
You make that revenue transparent with e-commerce tracking. I'll explain how it works in a few sentences:
When people make a purchase, they land on a thank you page. There, all e-commerce information such as the products sold, price, shipping costs, etc. is in the code.
With Google Tag Manager, we can take that code out, bundle it together and shoot it into Google Analytics so that it's insightful to you and you can use that information.
I think that's pretty understandable. Now let's go through step by step how to set up that e-commerce tracking.
Step 1: share the briefing with the developer
Google has made it all very easy and written an explanation detailing exactly what the developer needs to get right.
This is called a data layer. This is the information that appears "underwater" (i.e., in the code) on the thank you page.
If you want to get e-commerce tracking right, you need the purchase datalayer. If you click on the following link, you will see the purchase datalayer. The developer needs to build that in.
Step 2: Install Google Analytics 4 via Google Tag Manager
To use e-commerce tracking, of course, you need Google Analytics and Google Tag Manager. So you need to set those up and install them first.
How to do that is a whole tutorial in itself (and we've already written one, of course). So step 2 is to go through the following tutorial: Google Analytics 4 via loading via Tag Manager.
With the guide above, you can be sure that you have Google Tag Manager (GTM) and Google Analytics 4 (GA4) set up correctly.
Are you already using GTM and GA4? Then of course skip this step and go straight to step 3.
Step 3: Verify that the datalayer is working
If all goes well, by now the developer has built in the datalayer. It is now up to you to verify that the datalayer works.
You can do this by placing a (test) order and then inspecting the code on the thank you page. To do this, in Google Chrome, click the right mouse button and then select "Show page source.
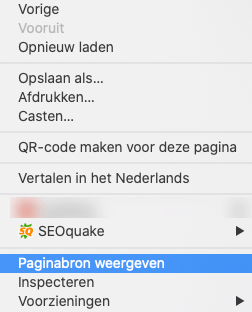
Next, look for the datalayer in the code by searching for "purchase. You should then find the developer's script, which of course looks exactly like the one Google described in step 1.
Step 4: set up Google Tag Manager properly
Now that you've done all the preliminary work, the real work begins. After all, step 4 is what this article is all about. Here you will find the roadmap on how to set everything up properly within Google Tag Manager.
To set up Google Tag Manager properly, we need to set up three things:
- The variables
- The trigger
- The tag
Before you get started with that, I'll briefly explain what it all is:
- The variables is for the variable data within the datalayer. For example, the products, price and shipping costs. We need to create all of these separately within Tag Manager.
- The trigger is the moment when all the information is fired. In other words, when we think all the data should be fired in.
- And lastly you have the tag. This is basically all the standard information we need and what system it should be shot in for (so in this case Google Analytics 4).
Step 4.1: setting the variables
When you are logged into Google Tag Manager (and have clicked on the correct account), you need to click on "variables" on the left.
Now we are going to create the variables there for all the variables used in the datalayer. They are:
- Transaction_id
- Affiliation
- Value
- Tax
- Shipping
- Currency
- Coupon
- Items
So that's eight.
To create a variable, click 'new' in the bottom right corner. At the top, enter the name of the variable and be sure to use a convenient and a recognizable format for it.
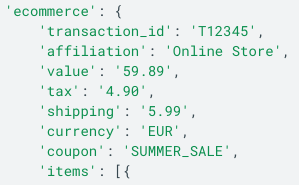
For example, name this one: 'DLV - ecommerce.items'. That ecommerce.items comes from the datalayer we created. The .items actually means that that item is under ecommerce. Kind of like a layer.
And if you look at the datalayer, you will indeed see that the items fall under the heading of e-commerce.
Then click 'Choose a variable type to start setting' and then 'Variable for data layer'.
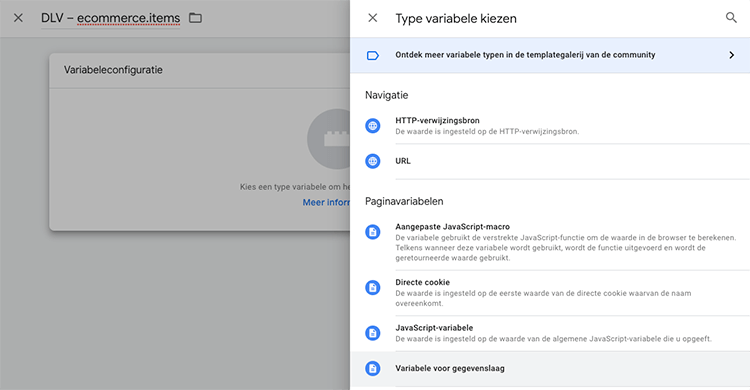
Enter ecommerce.items there, make sure the version for data layer is set to version 2 and click 'save' in the upper right corner.
You have created your first variable. Now repeat this process again for the other variables in the list:
- Transaction_id
- Affiliation
- Value
- Tax
- Shipping
- Currency
- Coupon
If you've done that, the list now looks like this:
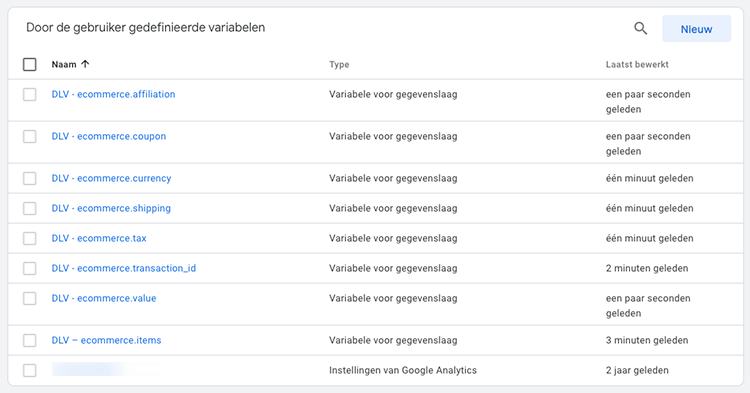
So. Part 1 of the Tag Manager setup is done. On to the trigger.
Step 4.2: setting the trigger
You can set a trigger in Tag Manager under the 'Triggers' heading on the left.
Click on that and then click on 'new' at the top right. We also need to give the trigger a recognizable name.
Our recommendation is "Event - purchase. This is because we are going to make an event (event) measurable and the word 'purchase' is the name of the event in the datalayer.
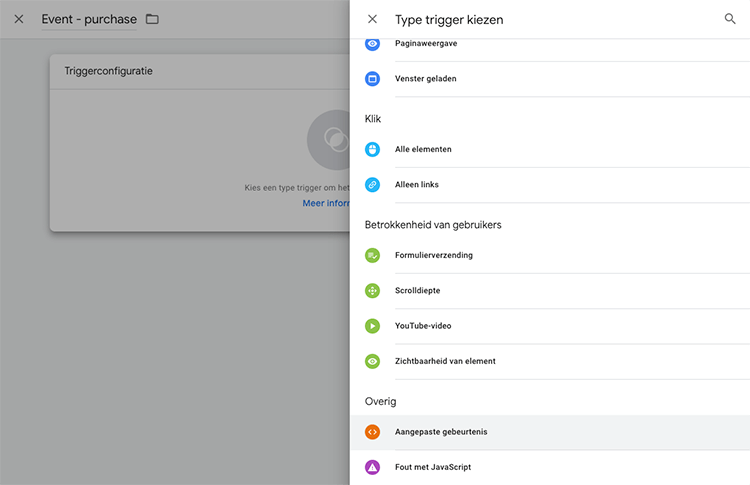
Then click 'Choose a trigger type to start setting' and then 'Custom event'.
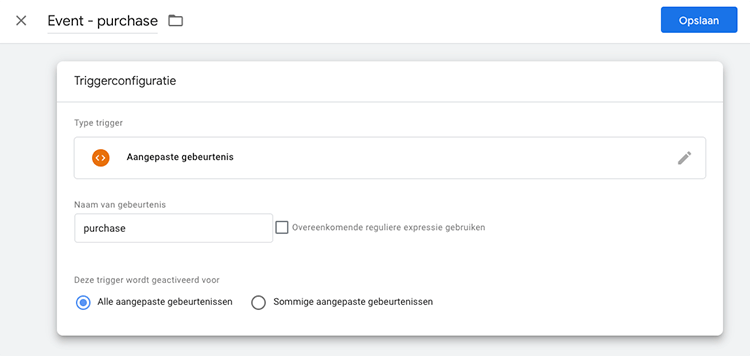
Then enter 'purchase' here and click 'Save' at the top right.
That was the trigger, now on to the tag!
Step 4.3: setting up the tag
Within Tag Manager, click 'Tags' on the left and then click 'New' again on the top right.
Give these a recognizable name as well. We use "GA4 - purchase" for this. The GA4 stands for Google Analytics 4 and purchase stands for what it is about.
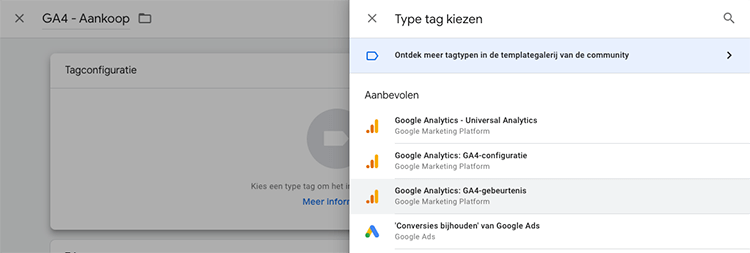
In the tag configuration, choose "Google Analytics 4: GA4 event.
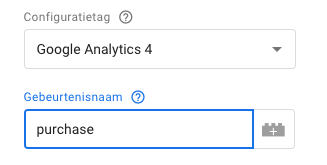
Under configuration tag, choose your Google Analytics 4 tag (it may have a different name in your case; it depends on how you set it up in step 2).
Then enter 'purchase' in the event name.
The final step within setting up the tag is adding the event parameters. Here you need to add the variables all piece by piece, so that this variable information comes along with your tag.
Under parameter name, enter the names of the variables from the datalayer. So again, those are the following 8 items:
- Transaction_id
- Affiliation
- Value
- Tax
- Shipping
- Currency
- Coupon
- Items
That will look like this:
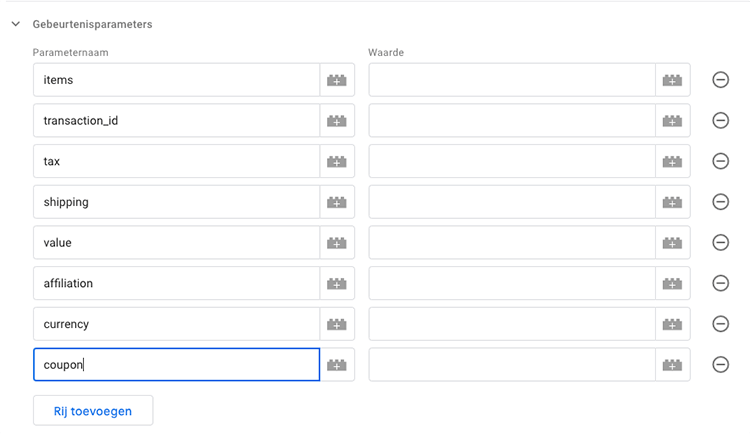
In the 'Value' row, you can click on the block and then pick the appropriate variables. That will look like this:
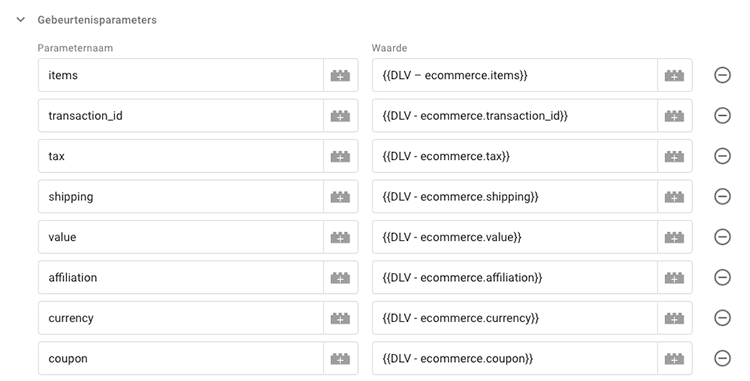
Then click 'Choose a trigger to activate this tag' and choose 'Event - purchase' there.

Then click 'Save' in the upper right corner, then 'Submit' and then 'Publish'.
Very good! You've turned on e-commerce tracking within Google Analytics 4. We're just going to test it now.
Purely to see if you've done it right.
Step 5: see if everything is working properly within Tag Manager: make a test order
Within Google Tag Manager, they have a very handy preview mode. You can access that by clicking on 'Preview' at the top right.
Enter the domain name of the website you want to test and click "Connect.
A new screen with your website will open. Make a (test) order there. Then you can see all variables and the datalayer back in preview mode (under variables and Data Layer).
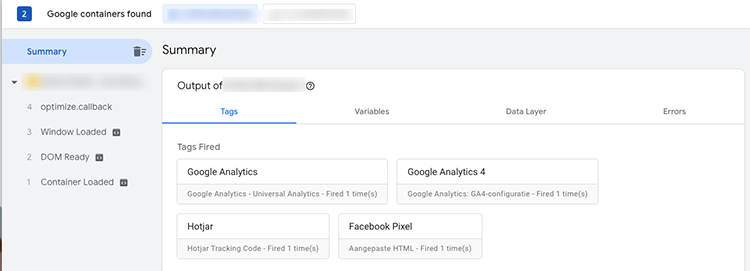
The final check, of course, is to look in Google Analytics 4 the day after to see if the sales actually show up again. If you've followed this guide properly, however, that won't be a problem.
This article was written on May 14, 2021 and updated on Aug. 4, 2023.
What is e-commerce tracking?
E-commerce tracking is the collection and tracking of data regarding the buying process within your webshop. By linking that data to, for example, Google Analytics 4 you can see at a glance how your individual products and pages or your webshop as a whole is performing. Pretty important if you manage a webshop!
What can you measure with e-commerce tracking?
With e-commerce tracking in GA4, you measure various product and transaction data. Think of the conversion rate of a page, how many people order something and the average order value. But also, for example, where people drop out in the ordering process or how long it takes them to make a purchase.
How should I set up e-commerce tracking in GA4?
In short, you first need to install GA4 through the Google Tag Manager and build in Google's purchase datalayer. Then in Tag Manager you set the variables, triggers and tags where in the latter you add the names of the variables from the datalayer as event parameters. A little more testing and you're done!





6 Responses to "Setting up Google Analytics 4 E-commerce tracking (with developer)"
The datalayer is that set when you link Google tag manager and Google analytics and use the Google side kit plugin of WordPress?
As far as I know, no. Site Kite does not create datalayers (I am not 100% sure).
Nice explanation, very helpful. Perhaps to add to the blog; in the tag still indicate that the e-commerce data should be sent along. Otherwise it will not be shown in GA4.
Thanks! What exactly do you mean?
I understood that you can also implement GTM on your website via GTM4WP, so you don't need a developer. GTM4WP will then also automatically put the datalayer on your website. Is that correct?
True! I wrote a blog about that too.