Menu
Table of contents
In this blog, I'll explain to you exactly how to set up e-commerce tracking within WordPress. Without the hassle of Tag Manager or messing around with codes. Just nice and simple, with a plugin. Let's get started.
Why do you need e-commerce tracking?
By setting up e-commerce tracking via Google Analytics 4, you get much more insight into the sales figures. This is because the figures are linked to the statistics of your webshop.
You can then use that information to fine-tune your online strategy. For example, you can see the number of products per transaction, the average order value, the conversion ratio but also the turnover of your shop per traffic channel.
In short: a lot of valuable information that will help you make better decisions.
How does e-commerce tracking work?
Actually, e-commerce tracking works simply. If you are a landscaper and someone fills out the quote form on your website, you will see a conversion in Google Analytics. This is because you have set up in Google Analytics that it is a conversion when someone arrives at the thank you page.
The same principle applies in e-commerce tracking. Only in this case, someone does not fill out a quote form, but makes a purchase. Once the thank you page loads in, the information about the purchase is passed to Google Analytics via the data layer that is on the thank you page.
A datalayer? No worries, I'll explain what a datalayer is below.
What is a data layer?
The data layer contains all the information surrounding the e-commerce data. So the products sold, price, shipping costs, size, etc. Everything that is relevant for you to know. For example, it looks like this:
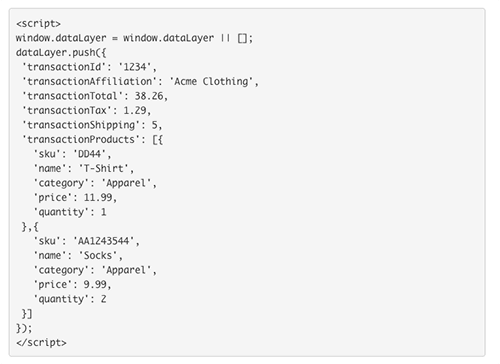
Creating such a datalayer yourself and putting it on the thank you page is possible. A developer will do it in no time. But for you (and me), that's tricky. That's why in this blog I explain to you how to do it using the Woocommerce Google Analytics Integration.
With that plugin as well as this guide, you can create a datalayer and e-commerce tracking setting in Google Analytics 4 with just a few clicks.
What do you need the WooCommerce Google Analytics Integration for?
With the WooCommerce Google Analytics Integration, you easily place the data layer on your website. With this free plugin you easily connect your webshop to your Google Analytics 4 account.
Follow the steps below to set up e-commerce tracking within your WordPress plugin with WooCommerce Google Analytics Integration.
Create free e-commerce tracking within WordPress in 3 steps
I assume you already have Google Analytics 4 and Tag Manager set up and installed. If that is not the case, please check the guide on how to load Tag manager through Google Analytics 4 first.
Before you get started, look up your measurement ID in Google Analytics 4.
Step 1: Look up Measurement ID in Google Analytics 4
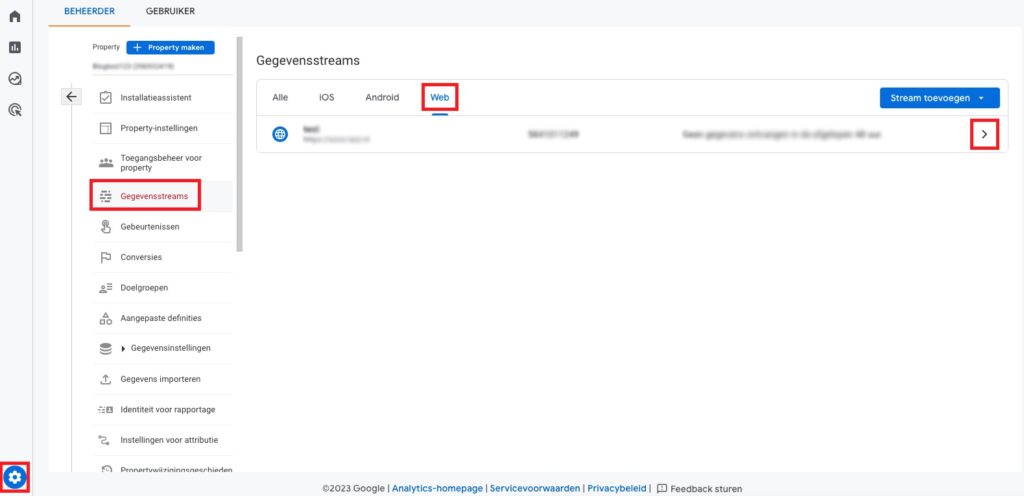
You can find your Meting ID by logging into Google Analytics 4 and clicking on Manage (cog) in the lower left corner. Then click on "data stream," open the "web" tab and click on the data stream you see there.
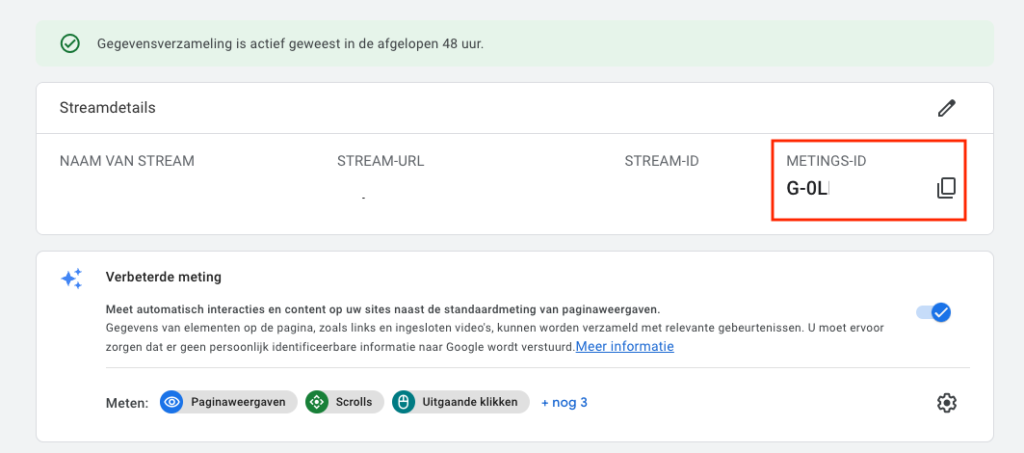
Successful? Then you will see the screen below. Copy your Measurement ID. You will need it shortly!
Step 2: Install Woocommerce Google Analytics plugin
To get started, log in to your WordPress website. Then go to "plugins" and click on "new plugins." As a search, enter "Woocommerce Google Analytics" and download the plugin.
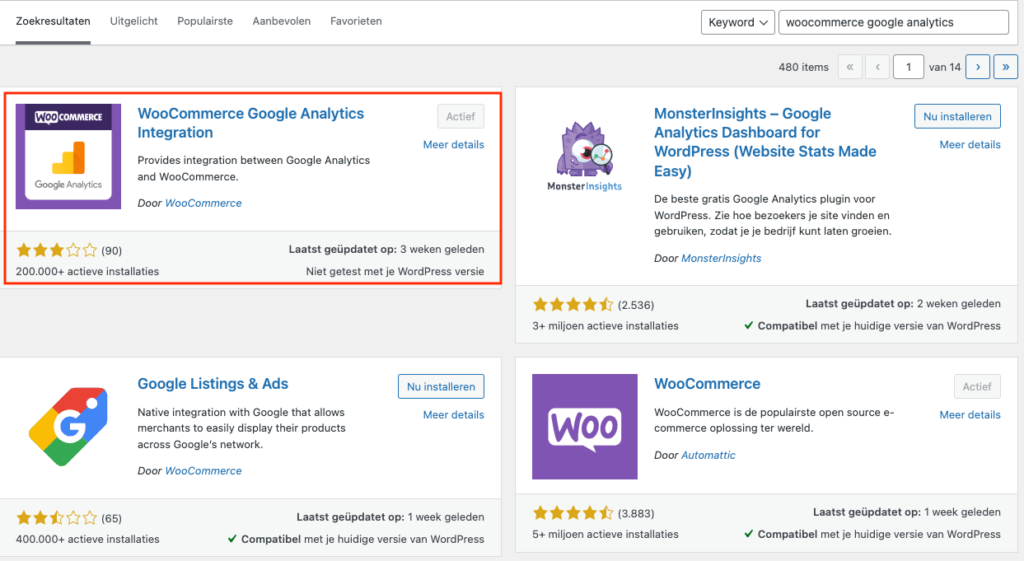
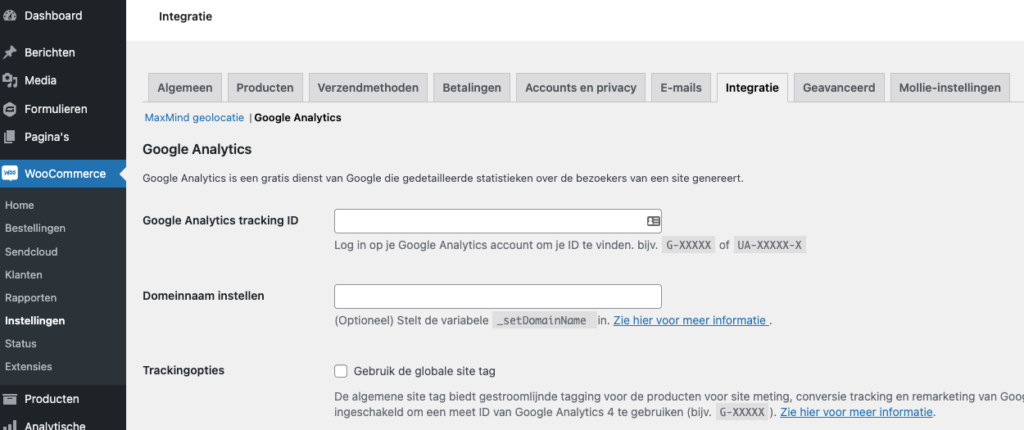
Did you download the plugin? Top. Then in the menu on the left, click on "woocommerce" and then "settings." Open the "integrations" tab and click on "Google Analytics. On to step 3.
Step 3: Set up Woocommerce Google Analytics plugin
Note: before you start this, it is important to know that this plugin is going to install a Google Analytics script on your website. So first, remove the Google Analytics script that you have loaded via Tag Manager or ever manually added yourself.
If all goes well, you now have the woocommerce integration tab open and are looking at a screen with fields that need to be filled in. This is what you need to fill in:
- Google Analytics tracking ID; here you enter the Measurement ID from step 1
- The domain name of your website (including www. if your website runs on it)
- Check "Use the global site tag" and make sure Universal Analytics enable is not checked (for setting up e-commerce in UA, follow this guide)
- You may leave the rest of the checkmarks as is.
And that's how easy it is to arrange e-commerce tracking within your WordPress website. Still, run a test order to check if the data is coming in properly in Google Analytics.
What happens if I have multiple webshops on different domains? Can I use the WooCommerce Google Analytics Integration for all my sites?
Yes, you can use the WooCommerce Google Analytics Integration for multiple websites, as long as each site has its own separate Google Analytics 4. You need to set up the plugin separately on each backend installation and make sure you use a unique measurement ID for each site.
Do I need to update my privacy policy if I use e-commerce tracking?
Yes, when using e-commerce tracking you may be collecting personal data such as user purchase history and location information. It is important to check your privacy policy on what data you collect and how it is used. Be sure to comply with the AVG and other relevant privacy laws.





Written by: Nicole de Boer
Nicole is Teamlead CRO at OMA. She spices up your website with fine SEO content and chops up your competition. Delicious and healthy all in one.