Menu
Table of contents
Step 1: Create a CookieBot account
Step one is very simple. Make sure you create an account with CookieBot :

Step 2: Upgrade your CookieBot account to a premium account
Having a premium CookieBot account allows you to customize your CookieBot banner and display it completely in the shape of your corporate identity. Otherwise, your CookieBot banner will look very amateurish. In addition, it provides a piece of recognizability. Saving again. Upgrading your CookieBot account can be done within your account itself. In this article you can read where exactly you need to be to arrange this.
Note that there are two different interfaces of CookieBot available. Make sure you have the right interface in front of you, otherwise it will be searching for a needle in a haystack to upgrade your account. The price for a premium account varies greatly. For a small website up to 350 subpages, you pay €12 per month. For a medium website up to 3,500 subpages you pay €28 per month and for the larger websites with more than 3,500 subpages the monthly fee is €49. All in all, a small investment with big positive consequences because it means you comply with the regulations around cookies.
Step 3: Fill in the category Domains properly

Make sure you enter your domain name under Domain name and set the Scan frequency to 'Monthly'. If you also want to test your Cookiebot banner in your test environment, you can enter your staging URL under Domain alias. Of course, it is important that a GTM container is also present on this test domain!
Step 4: Customize your banner to your liking
This is where having a Premium Account comes in extremely handy as you can set your theme to 'Custom'. Here you can completely customize your CookieBot styling to your own taste. We personally always recommend giving the Background of the "Accept All Button" the same color as the main Call to Action buttons on your website.
In addition, there are several options to choose in terms of the design of the banner itself. In almost all cases, we choose a Swift banner template in combination with a Bottom Position. With this, the banner is positioned nicely at the bottom of the page and does not appear as a very annoying and full-screen pop-up. When you go to Privacy Trigger, you can uncheck 'Activate Privacy Trigger'. This ensures that visitors, after giving permission for cookies, are not continuously presented with an icon that allows them to change their cookie preferences at any time. You can skip the Declaration category unless you have a custom cookie policy. In 99% of the cases this is not the case.
In the Content category you can format the text of the cookie banner. Note: Select the Dutch cookie statement here and also add English as a language if your website also attracts foreign visitors. For this you can use the green plus sign:

Note: At the very bottom, select English as the 'Default language'. This ensures that the English version of the cookie banner is always shown to visitors whose language is not recognized by Cookiebot. Suppose a visitor with Spanish language settings visits your site, this person will see the 'Default language'. In other words, the English variant. The language of the cookie banner that is displayed depends on the language settings of the visitor. Dutch visitors with Dutch language settings will therefore 'just' see the Dutch cookie banner, even though the 'Default language' is set to English.
You can leave the text within the cookie banner at default, or you can choose to let your creativity run wild. For example, we ourselves chose to incorporate a "fun" pun ... (or well fun ...?).

Step 5: Viewing your cookie banner via preview mode
After you have created your cookie banner, you are naturally eager to see the results. You can easily view your newly designed cookie banner by clicking on 'Preview banner' in the left menu. This allows you to make a number of changes if your cookie banner is still not entirely to your liking:

Step 6: Implement CookieBot in Google Tag Manager
Now that you've set up your cookie banner to your satisfaction, of course you'll want to display it on your website itself. We always choose to do this through Google Tag Manager and not through the CookieBot plugin itself, in order to keep the source code as clean as possible. In addition, within Google Tag Manager you are able to set up everything around Consent V2 properly.
What you need to do is the following:
- Go to Google Tag Manager
- In the left screen, go to Templates and in the Tag templates in the gallery, search for "Cookiebot.

- Add the template to the workspace and then confirm that you want to add the community template:


Now that you've done this, several tags, variables and triggers have been added to the workspace, top! After all, this is what we will need in the upcoming steps. Go to 'Tags' and then choose to set up a new Tag Configuration. Now under the 'Custom' category you will see the Cookiebot CMP Tag you just imported:

Now you see the settings for this Tag in front of you. At 'Cookiebot ID' you fill in your Domain Group ID. You can find this in Cookiebot itself under 'Your scripts':

Copy your Domain Group ID and then paste it into the Cookiebot CMP Tag in Google Tag Manager under 'Cookiebot ID':
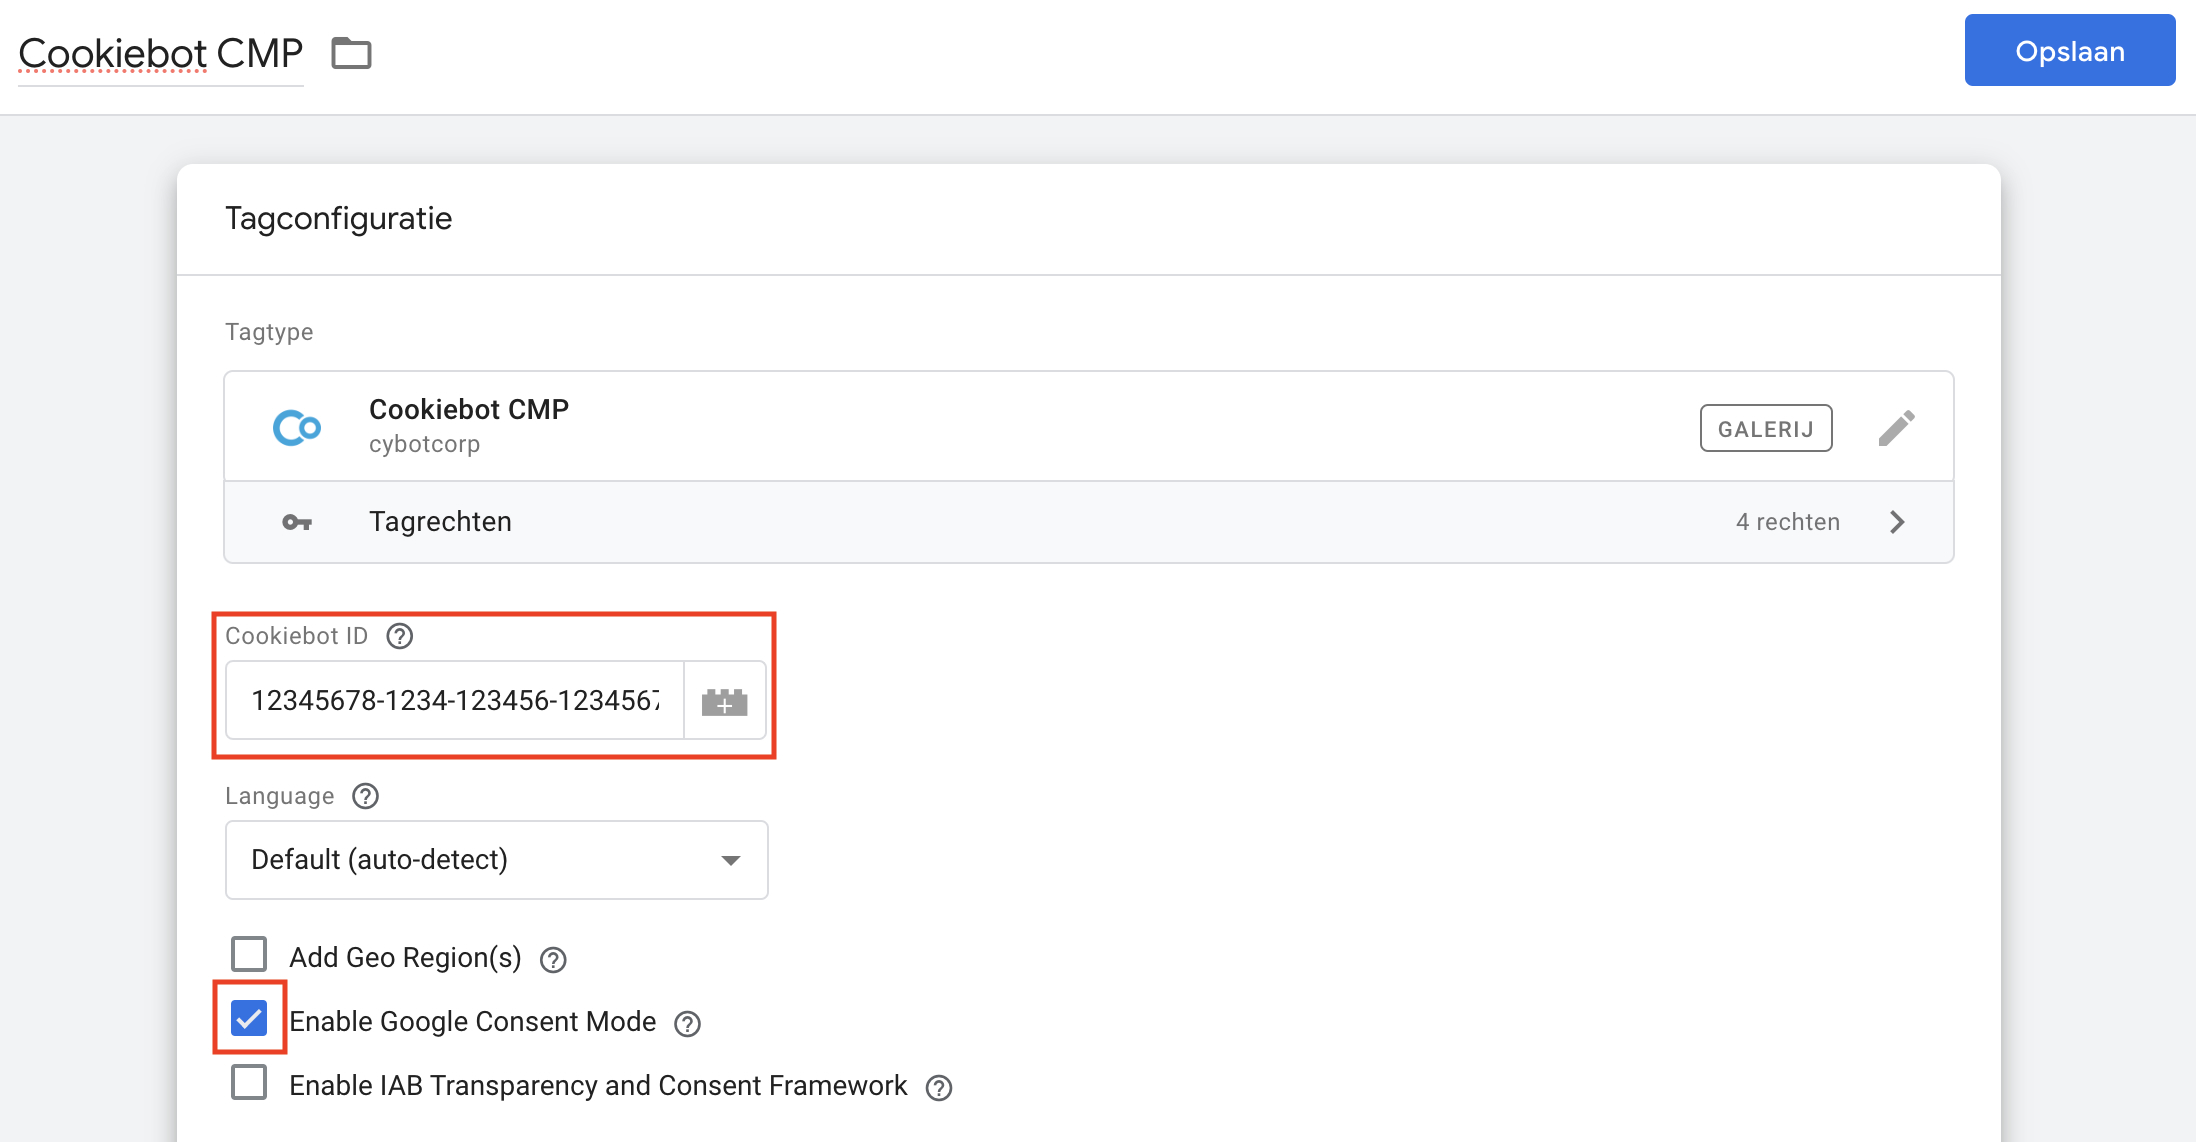
Note: Make sure you have turned on the check mark under 'Enable Google Consent Mode'. Next is to set the 'Default Consent State' as follows:

I won't burden you in this blog article with too many technical stories and especially not go too deep into this, but this has to do with Consent V2.
We have arrived at the last section. Are you still there? Great! Then we can go ahead and add the Trigger. Add the Consent Initialization trigger and your cookiebot banner is set up properly!

Now all that's left is to publish the workspace you just set up so that it is visible to the outside world. What you need to do is very simple. In Google Tag Manager, make sure you submit the customizations and you're done:

If you have any questions as a result of this guide or are not quite sure about something, please feel free to contact us or ask your questions below!




Written by: Nick Havekes
Nick is a SEA specialist at OMA. He analyzes your campaigns like a football match and then provides winning tactics. Ronald Koeman, eat your heart out.