Menu
Table of contents
After all, don't you want to know which ad converts and which doesn't?
And you want your ad to be seen by people who have shown real interest in your service or product, right?
Yes, of course!
But before we dive into the depths, let me tell you some important basic facts about the Pixel.
Let's go!
What is a Facebook Pixel?
The Facebook Pixel itself is no different than a piece of code you add to your website, with the goal of learning more about your target audience.
The Facebook Pixel is also called Facebook Tracking Pixel, because it literally "tracks" what your visit does.
That's really all it is.
And just in case you like to know: it's a piece of JavaScript.
That's really all you need to know about what exactly the Facebook Pixel is and how it works.
It is much more important to know what you can do with it!

So, what can you do with a Facebook Tracking Pixel
See, now it gets interesting!
After all, this is what it's all about: the possibilities offered by the Facebook Pixel.
The following features of the Pixel are by far the most important:
- Remarketing (Also called retargeting )
- Track conversions
- Building target groups
Remarketing
Remarketing or retargeting is actually very simple to explain.
Suppose Jan is browsing within the offers on your webshop.
For whatever reason, Jan leaves the shop and goes to check out the competitors as well.
Jan hesitates and lets it sink in for a moment to decide later where to make his purchase.
After dinner, Jan crawls on Facebook for a while and what does he see?
Your ad with your product.
Jan is remembers your webshop and is immediately sold again.
The image below explains it perfectly.
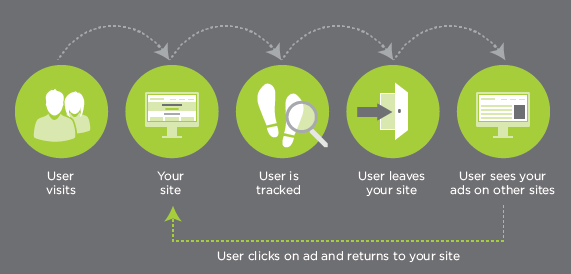
Source : https://www.grayboxpdx.com/blog/post/why-use-remarketing
Remarketing is re-engaging your target audience with a Facebook ad to prompt them to take action.
This could be a purchase, reading a blog, downloading an e-book, contacting you or some other conversion.
Track conversions
In terms of conversions, the Facebook Pixel has two functionalities:
- Conversion tracking
- Conversion optimization
With conversion tracking, you can track exactly which campaigns and which ads led to which conversion.
Very handy, because it lets you know exactly which budget led to which revenue.
Because conversions are tracked, you can also see exactly which ads are doing well and which are not.
This is also known as conversion optimization: optimizing the ads to increase the conversion rate.
Because the Facebook Pixel makes everything so measurable, you can start testing right away.
Building target groups
Because the Facebook Pixel is installed on your website, you learn more about your target audience.
For example, how old they are, what their interests are and what pages they like.
Facebook distinguishes between three audiences within its ad tool:
- Custom Audience
- Similar target group
- Saved audience.
1. You can base the custom audience on visitor behavior for your remarketing campaigns.
Suppose you want to send an ad to the people who landed on page X, that's a custom audience.
2. The comparable audience, as the name implies, is similar to the website visitors you have on your website now.
So it is not about the people who have already been to your website, but about people who have not yet been to your website.
Obvious right?
3. The last target group is the stored target group.
This is a custom created target group that can be set up based on the similar target group and the custom target group.
You can then filter by interest, age or demographics, for example.
The benefits of the Facebook Pixel at a glance
By now, you should be convinced of the usefulness and power of the Facebook Tracking Pixel.
If you haven't already, here are four more benefits I've listed for you:
- Installing the Facebook Pixel is a breeze
- The relevance of your ads increases dramatically. Ads connect better and are more personal.
- The number of conversions and clicks is higher compared to regular ads.
- The cost is lower than normal ads.
Conclusion: you can't ignore the Facebook Pixel anymore.
You just have to use those.

Where can I find my Facebook Pixel ID?
I'm assuming for now that you already own a Facebook ad account.
Within Facebook, click the arrow at the top right and then "Manage Ads" to go to your Facebook ad account.
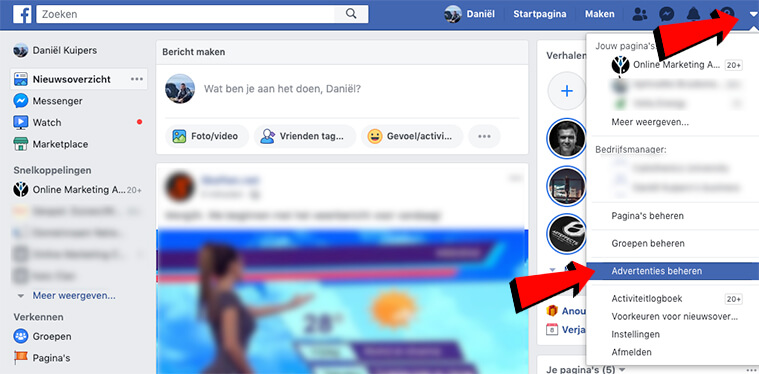
Then click on the account you want to find out the Pixel from.
Then click on "Ad Management" in the upper left corner and then "All Tools.
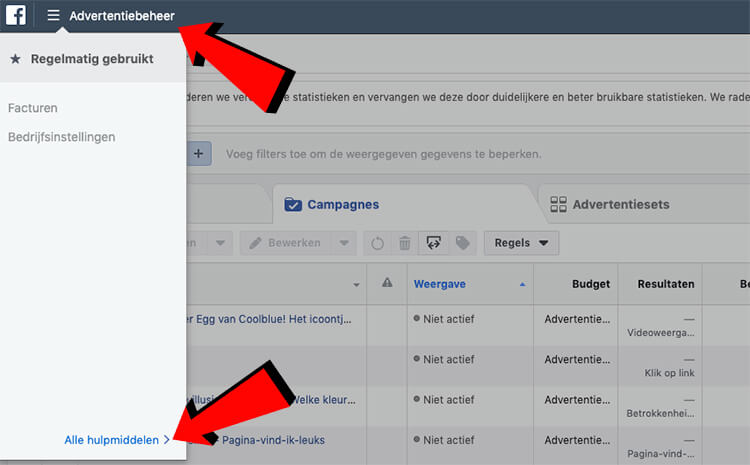
Then in the 'Measure and report' row, click on 'Pixels'
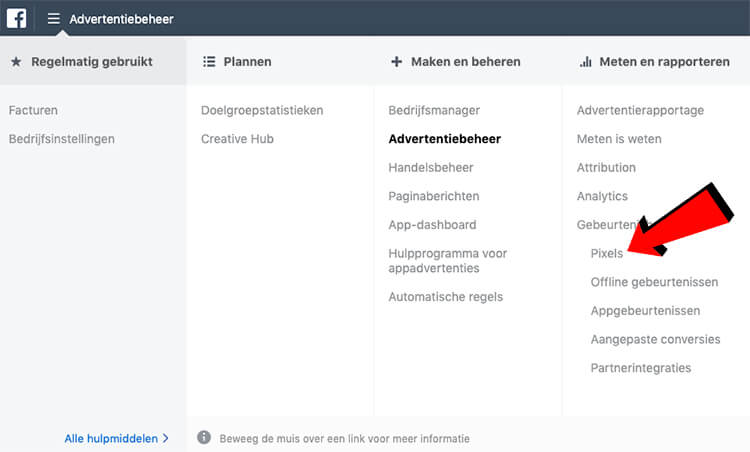
Et voilà!
That's where your organization's Facebook Pixel is located.

In 12 Steps: Installing Facebook Pixel with Google Tag Manager
Now we come to the part I enjoy doing most: installing the Pixel with Google Tag Manager.
Before you can do this, your website must have Google Tag Manager enabled.
For that, please refer to my blog: Roadmap for installing Google Analytics via Google Tag Manager.
Once you've done all that, then you can move on!
Step 1: Go to where you can find the Facebook Pixel and click "Set up Pixel.

Step 2: Click on "Manually Install Pixel Code Yourself.
Step 3: Scroll down and copy the full pixel code.
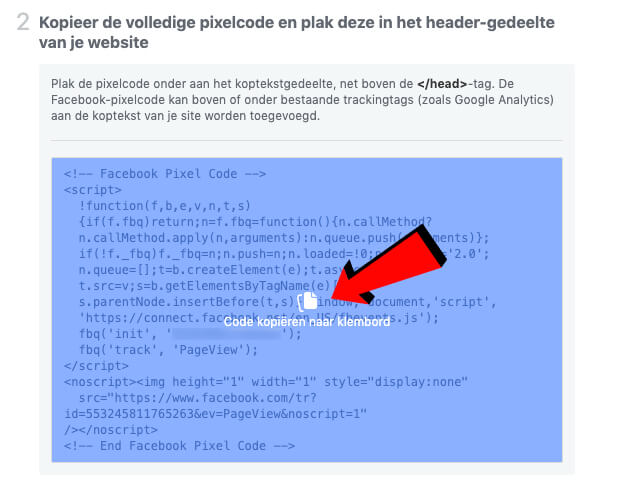
Step 4: Go to the Google Tag Manager website(https://www.google.com/intl/nl/tagmanager/) and click 'Log in' at the top right.
Step 5: Click on the account you want to install the Facebook Pixel on.
Now the real work begins!
Step 6: Click on "New tag.
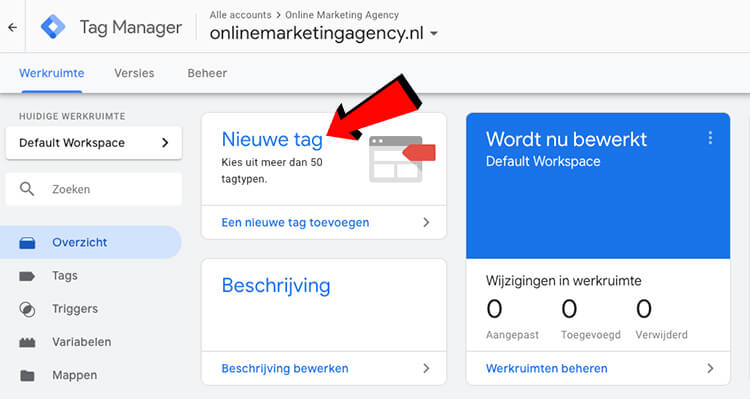
Step 7: Replace 'Nameless tag' with 'Facebook Pixel' in the upper left corner and then click 'Tag Configuration'.

Step 8: In the row, click on "Custom HTML.
Step 9: Paste the pixel code into the field where it says 'HTML'.
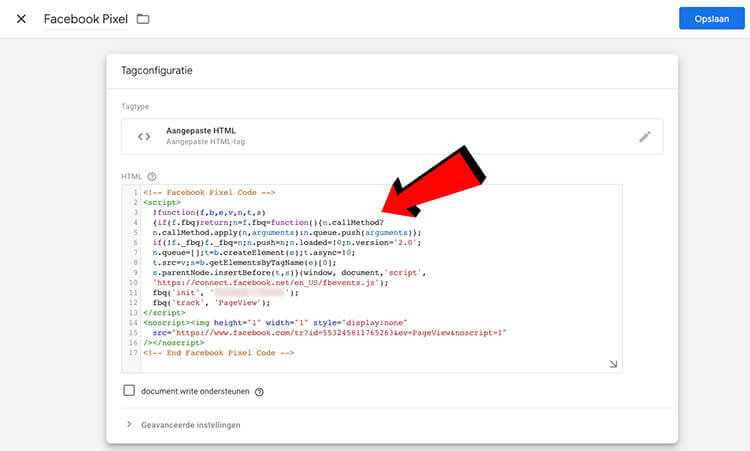
Step 10: Click on "Triggers," then click on "All Pages.
Step 11: Click "Save" in the upper right corner.
Step 12: Click 'Submit' in the upper right corner, then 'Publish' and then 'Continue'.
Additional step: Verify that the Tag is working by viewing your website in Google Tag Manager's preview mode.

Facebook Pixel on your WordPress website: why you shouldn't install it with a plugin
WordPress is a great platform because you can add additional functionality to your website at the click of a button by simply installing a plugin.
Very convenient, but also dangerous.
Because the more plugins you install, the bigger your website becomes, the slower your website becomes and ultimately the worse you are to find in Google.
The rule of thumb I use is: always try to have as few plugins as possible and if it doesn't have to be done with a plugin, don't do it with a plugin.
You can easily install the Facebook Pixel through Google Tag Manager, without having to install a plugin for it.
So be sure not to use a plugin, but go through all the above steps at a leisurely pace
Especially if, for example, you want to use Hotjar in the future or, for example, measure your conversions better.
Then Google Tag Manager is the tool to use.
Facebook Pixel checker: find out if the Pixel is working
In the extra step, I already told you how to find out if you have gone through the Google Tag Manager steps properly and if your Tag is working.
In addition, I found another very handy Google Chrome extension for you.
Namely, the Facebook Pixel Helper.
This is an extension that checks if your website is correctly provisioned with the Facebook Pixel.
After you install the extension, all you have to do is go to the website it is about and click on the Chrome extension.
This Facebook Pixel checker then immediately shows you whether the Pixel is properly installed or not.


6 Responses to "Facebook Pixel: Tracking on your WordPress website"
Thanks for the great article Daniel! This is one of the better, clearer articles I've come across about the Facebook Pixel. Especially online, "measuring is knowing" applies. Without a properly set pixel, advertising on Facebook makes no sense.
Sander from Webcrafter
What a compliment Sander! Thank you for that.
Do you have numbers on retargeting?
What figures would you like to see Hans?
Thank you!!! This was exactly what I needed to get the Pixel working (had been working for 1.5 hours). Top article!
Greetings Marije
Glad to hear it! You're welcome.