Menu
Table of contents
There are several ways to get website verification, but 1 is by far the most convenient! Namely, verification at the DNS level.
That way you verify your website as a domain-property so all subdomain variants are also verified!
So whereas before you had to manually verify multiple variants, now you can do it super simply all at once. In this blog, we explain step by step how to verify Search Console at the DNS level in Hostnet.
What is the DNS?
What is the DNS anyway? DNS stands for Domain Name System, and it refers to the technical system behind how domain names work on the Internet.
The DNS links domain names to IP addresses. Just as you look up a number by a name in an old-fashioned phone book.
By verifying Search Console at the DNS level, the data is made available to each network.
Roadmap for verifying at the DNS level
Not a star at Google Tag Manager and prefer not to mess around in website code? Then you can easily get your website verified at the DNS level.
Follow the following 4 steps to get your website verified.
Step 1: Add your website to Search Console
Before you can have your website verified by Search Console, you must first add your website. You do this by logging into Search Console.
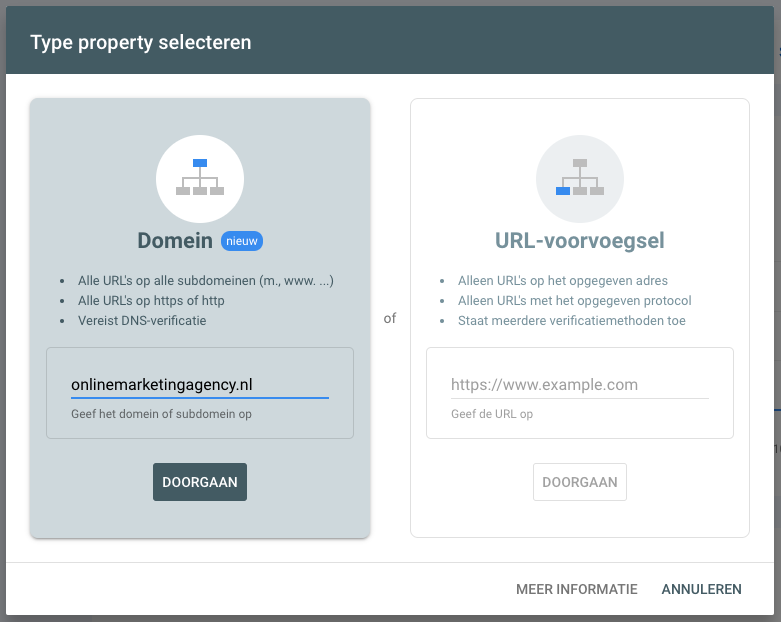
Next, add your property as a domain.

Insert only the domain name here. So no www., https or http. In fact, this way you automatically verify all subdomains and protocols as well. Ideal.
Then click continue.
Step 2: Copy the TXT record
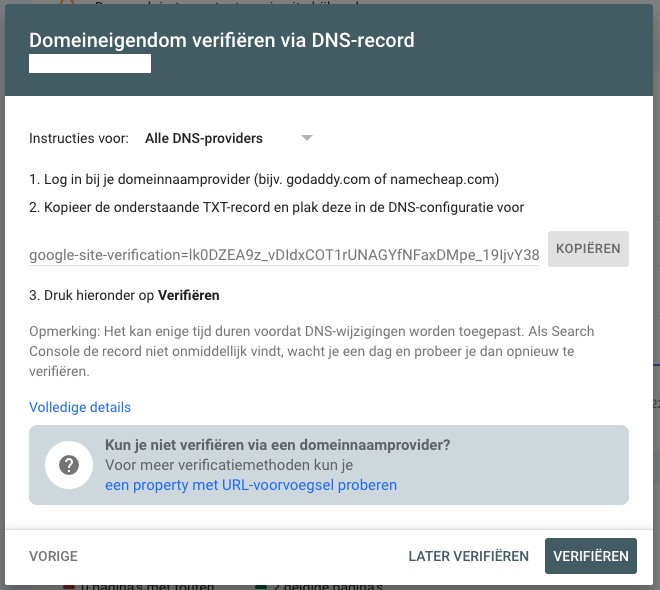
The next step is to copy the TXT record. If all goes well, you have added your property and Google Search Console is now hard at work verifying the property.
You will see the following screen:

Press copy.
Step 3: Go to Hostnet and add the TXT record to the DNS
Next, go to your hosting party, in this case Hostnet, and log in. In this blog we'll show you how to add the TXT in Hostnet, but this works in a similar way at every hosting party.
Once you are logged in, go to services. There you will find your website. Press the "..." on the right for more options and click Change DNS.

Here, under content, paste the TXT code you copied in step 2. Change the settings to TXT and set the TTL to 600. The Time To Live indicates how many seconds a record is cached by the server.

Don't forget to save the change!
Step 4: Confirm it in Search Console
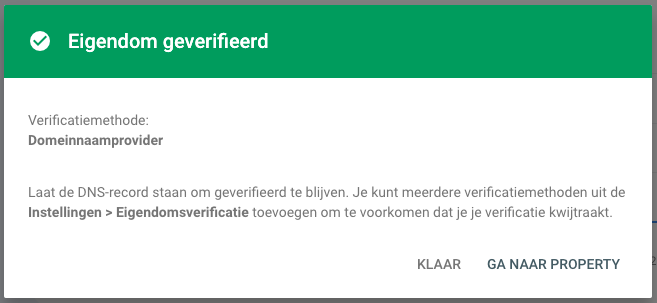
Yes, you're almost there. The TXT record has been added to the DNS, so we're going back to Search Console. If all goes well, the screen from step 2 is still open. Now press verify. And voila! Your website is verified at the DNS level.

GSC may need a little more time to process the change. If you are unable to verify the DNS right away, please try again at a later time.
Want to verify your website through Google Analytics, you can do that too! Read exactly how to do that in this guide.
Why is verifying at the DNS level useful?
By verifying Google Search Console at the DNS level, all protocols and subdomain variants are also automatically verified. So that means you only need to verify the domain once!
What is DNS?
DNS stands for Domain Name System. The DNS is the technical system behind the operation of domain names on the Internet. Through the DNS, names can be easily linked to IP addresses.
How do you verify Search Console at the DNS level?
You can easily verify Search Console at the DNS level with this roadmap. First, create a property, copy the TXT record and add it into the DNS through the hosting party. Then verify Search Console, and voila!


Written by: Nicole de Boer
Nicole is Teamlead CRO at OMA. She spices up your website with fine SEO content and chops up your competition. Delicious and healthy all in one.