Menu
Table of contents
You've changed the colors of your buttons, added additional text and changed images. And yet you see no improvements in conversion rates.
That's probably because you made the changes on gut feeling. And that's not always best.
That's why in this blog we explain to you how to install Google Optimize. So that you can increase your conversion rate based on the results of real, reliable tests.
What is Google Optimize?
Google Optimize is a free tool from Google that allows you to easily set up A/B tests on a particular page. Any change to your website can affect conversion rates, so you want to know what works - and what doesn't.
Google Optimize allows you to test any changes before making them permanent.
A/B testing with Google Optimize
By setting up A/B tests with Google Optimize, you can test whether the changes on your website actually produce the desired results. This is very useful, because it is a waste to make changes that do not yield anything ... or even the opposite result.
By setting up an A/B test, half of your visitors get to see the original page and the other half get to see the test variant. Then, based on the data, you can see which variant performs better and generates the most conversions.
Google Optimize account setup
To set up your account, go to the Google Optimize site and create an account. To do this, use the Gmail account you also use for Analytics. Indicate whether you want to be notified via email, whether you give Google access to your data and agree to the terms and conditions.
If all goes well, you will now see the screen below. We will now first link Google Optimize to Google Analytics. This will give you access to the data from your experiments so you can find out exactly what adjustments are needed to bring in more conversions.
To do this, press Settings (top right).

Then press "link to Analytics."

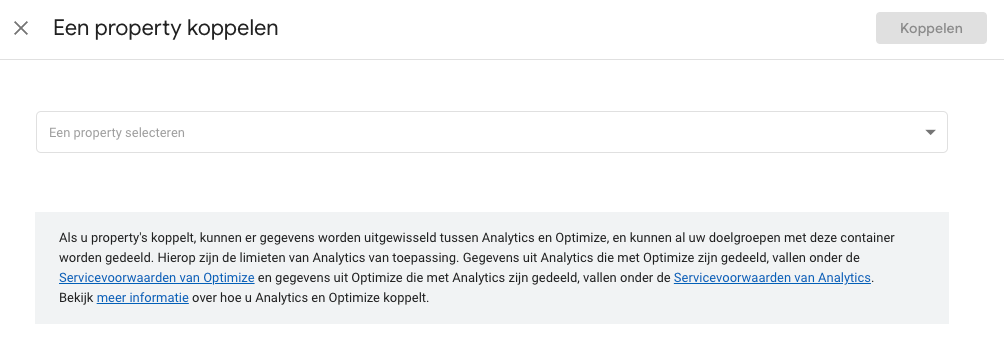
Next, select the property you want to associate with the Optimize account. You will see all the properties that are linked to the email address you used. Select the appropriate property and click "Link".

Putting Google Optimize into code with Tag Manager
You've now linked Google Optimize to Google Analytics. Time for the next step: adding the Optimize code in the <head> of the website.
This can be done in 3 ways:
- You can add the snippet directly to the website source code
- You can add the code with a plugin in WordPress
- You can use Google Tag Manager.
We explain in this blog how to link Optimize with Tag Manager. That's because then you don't have to mess around with the website code yourself.
Copy the Optimize ID you see under settings and open your Tag Manager account.

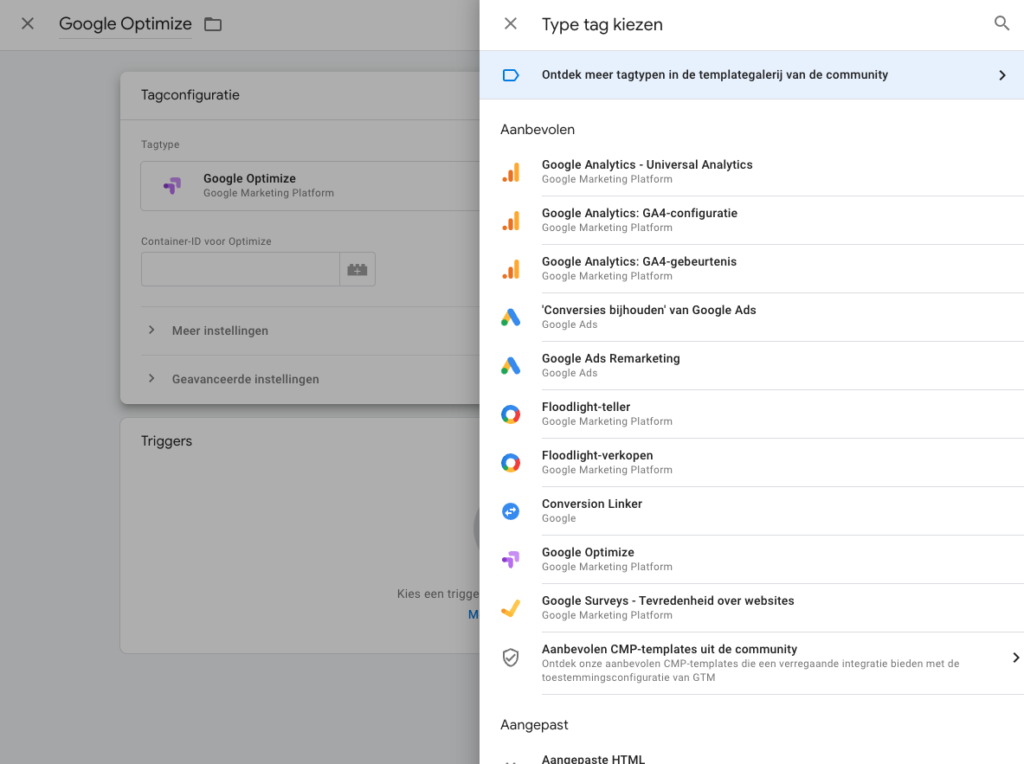
Create a new Tag and title it "Google Optimize". Press "Tag Configuration" and select "Google Optimize" from the list.

Next, under "Container ID" enter the Optimize ID we copied a few steps back. Next, save the Tag without adding a trigger.
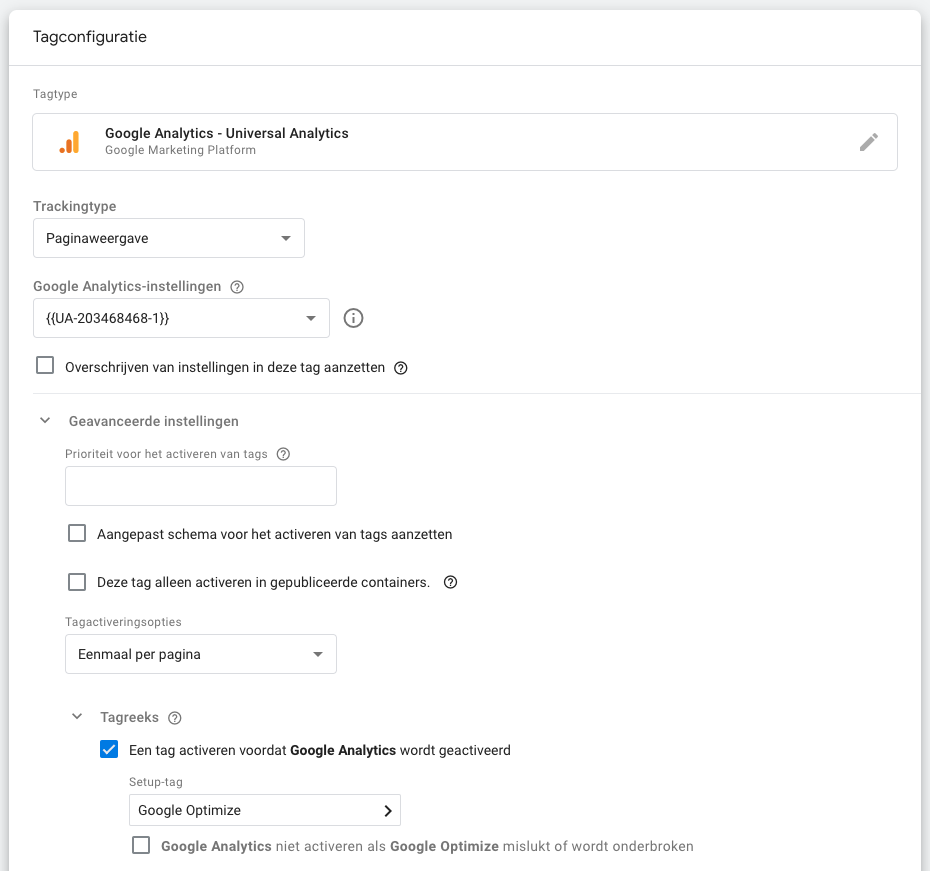
Open the Google Analytics Tag. This is where we are going to add the Optimize tag.
- Under tag activation options, select "Once per page"
- Then click on Tag string and check "Activate a tag before Google Analytics activates", that's where you then enter the new Google Optimize tag. It will look like this:
It looks like this:

Press save and publish the changes. Tada, you've successfully added Google Optimize to your website!
Installing the right Chrome extension
But we're not there yet. The next step is to install the Google Optimize chrome extension. You need the extension to use Google Optimize's visual editor to make changes to the test version.
Getting started with Optimize
To check that you've completed all the steps correctly, open Google Optimize and hit "Get Started." Enter the name of your test and the URL of your website. Choose the type of test you want to run. For now, you can choose A/B test to check that everything is set up correctly. Press "Create."

Press "add variant," enter the name of your variant and press "create."

If all goes well, you now see your original page and your variant in Google Optimize. Click on "edit."
Did you do everything right? Then now your website opens and you can use Optimize to make changes and set up your test. This is how you find out if your changes are actually producing the desired results.
Good luck!
More conversion optimization tips for your website? Then also read:
- Set up free E-commerce tracking within WordPress (for Dummies)
- Optimizing thank you page: 17 concrete tips
- 12 tips for improving the search function within your website
- 10 online marketing tips for your work-at-home website
What is an A/B test?
An A/B test is a testing method to measure the effectiveness of two options. Visitors to your website are split into 2 groups, each of which is shown a different expression. This allows you to determine which expression is most effective based on the data.
What is conversion optimization?
With conversion optimization or CRO (Conversion Rate Optimization), you increase the percentage of visitors who perform an action on your website. That can be anything: buying a product, requesting a quote, contacting you or simply subscribing to your newsletter. So with CRO, you get more return from the same number of visitors.
Is Google Optimize free?
You can use Google Optimize for free. All the features you need to set up an A/B test are free to use. However, you are limited in, for example, the number of experiments that can run side by side and linking target groups from Analytics to Optimize. For that, you can purchase the Optimize 360 variant.


Written by: Nicole de Boer
Nicole is Teamlead CRO at OMA. She spices up your website with fine SEO content and chops up your competition. Delicious and healthy all in one.