Menu
Table of contents
And to determine how effective those euros were, it is necessary that the data be as pure as possible. Therefore, you need to exclude your website visits and, for example, those of your SEO specialist and web designer in Analytics.
After all, these are irrelevant and cloud your data and insights.
How to add an IP address filter to exclude the data of certain people, I'll explain to you now.
How do you find out what your IP address is (and how do you find out someone else's IP address)?
Before I explain how to figure out what your IP address is, I have a little assignment: first, make a note of all the locations/WIFI networks from which you access your website, including the people working on your website.
Let me give you an example:
| Where / who? | IP address |
| Office | |
| Home above | |
| Home downstairs | |
| Location X (example) | |
| Location Y (example) | |
| SEO specialist | |
| Web designer |
Next, it's up to you to go to WhatsMyIP by location / WIFI network and copy and paste the IP address that appears at the top middle of the screen after the location.
And then, of course, you ask, "How do I find out the IP address of my web designer and SEO specialist? Well, by asking him to go to WhatsMyIP and send his IP address to you :-).
Here's how to add your you IP address filter in Analytics (and in the right place)
This is where you really need to pay attention. I see this going wrong sometimes.
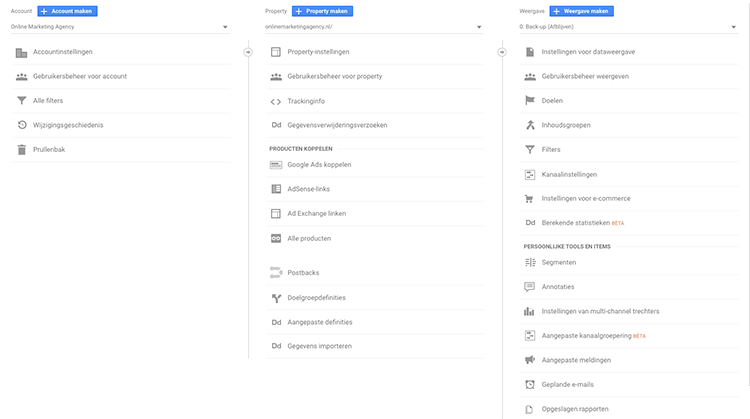
Namely, NEVER add filters at the account level, but always at the view level.
With adding account-level filters, mistakes are easier to make and that can cause you to lose valuable data.
So not on the left, but on the right.

Maybe I just went a little too fast, but I'm now going to show you how to add such a filter to Google Analytics.
Step 1: Go to the Google Analytics website and log in.
Step 2: Find the appropriate account where you want to add the filter and click on the cog icon in the lower right corner so that you see the following screen.

Step 3: Select the view where you want to add the IP address filter.
Tip: always have a view where no filters have been added. In case you made a mistake, you will always have your data. I always create a view called '0. Backup (Remain)' and add the filter to the main view.
Step 4: Click on "Filters.
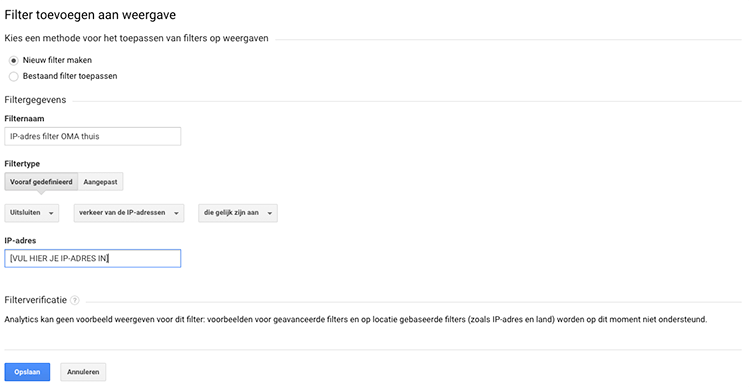
Step 5: Click on "Add Filter.
Step 6: Fill in the filter name and make sure it is recognizable.
So always start with "IP address filter" and then the location or who it is. You listed this information during the earlier exercise.
Step 7: Select 'Exclude' under 'select filter type'.
Step 8: Select 'Traffic from the IP addresses' under 'Select source or destination'.
Step 9: Select "Those equal to" under "Select expression.
Step 10: Paste the IP address in the appropriate place and click "Save.
The end result will then look like this:

Step 11: Repeat the above steps until you have added all IP addresses as filters.
That way, your SEO specialist, web designer and you yourself no longer have any influence on your data, so you can be sure that all the data you see comes from your visitors or customers. And that, of course, is what you want to have.


Written by: Daniel Kuipers
Daniel is the founder of Online Marketing Agency. He constantly scours the Internet for the latest gadgets and tactics and blogs about them in understandable language. Well, sometimes.