Menu
Table of contents
Because once a visitor is off your website, you don't know what he or she is up to.
And so you just have to take your affiliate party at their word that they have brought in X number of visitors through your website.
However, there is something you could do to find out how many people click through to your affiliate partner.
Namely, measure outbound clicks on affiliate links.
You then know exactly how many people clicked on an affiliate link.
This can be done very conveniently and easily with Google Tag Manager.
And how to do that, I'm going to explain to you now.

First things first: installing Analytics + Tag Manager and setting it up correctly
Before we can measure clicks on outbound affiliate links, it is first necessary that you have a Google Analytics account, that you have Tag Manager and that everything is set up correctly.
And to help you do that, I've already written a blog about that.
Namely: Roadmap for installing Google Analytics via Google Tag Manager
So that is the first step to follow: read that article and implement everything.
And no, you can't skip that step!

Measuring outbound links is similar to measuring phone calls
In addition to measuring outbound links, if you want to measure how many people clicked on the phone number within your website, I recommend clicking here.
In fact, I have already written a blog about that as well.
And that article is incredibly similar to this one.
But that aside.
Let's begin
Step 0 you have already performed: Set up Google Analytics via Google Tag Manager.
So on to step 1: Log into Google Tag Manager and click on the appropriate account.
If you have read and used the article of measuring clicks on your phone number, then you have already performed the following steps.
But to measure everything properly, we need to turn on some variables.
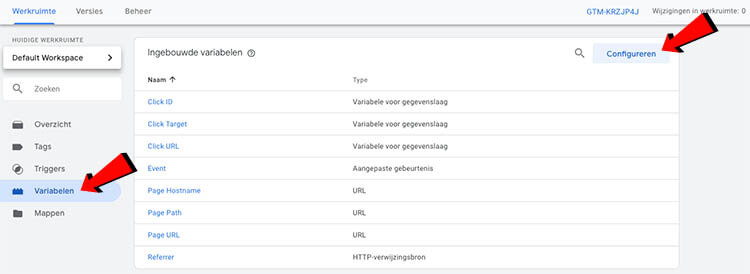
So step 2 is: click on 'Variables' on the left in the row and then click on 'Configure' at the top right.
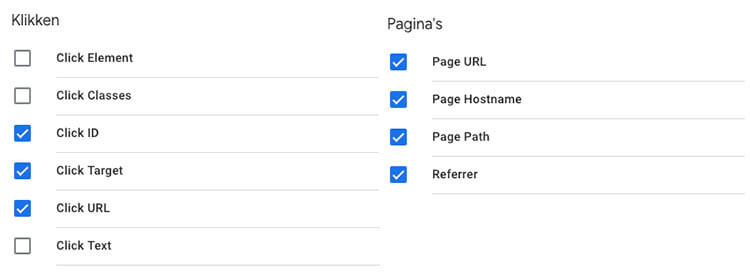
Step 3: Make sure the checkboxes are turned on under the heading "Pages and "Clicks.
Step 4: On the left, click on "Overview" and then "New Tag.
Step 5: Change 'Nameless tag' in the upper left corner to, say, Affiliate link click (or some other name you can easily remember later).

Step 6: Click on "Tag Configuration.
Step 7: On the right side of the list, click on "Google Analytics - Universal Analytics.

Step 7: Change "Page View" to "Event.
Now don't fret, I'll guide you through it!
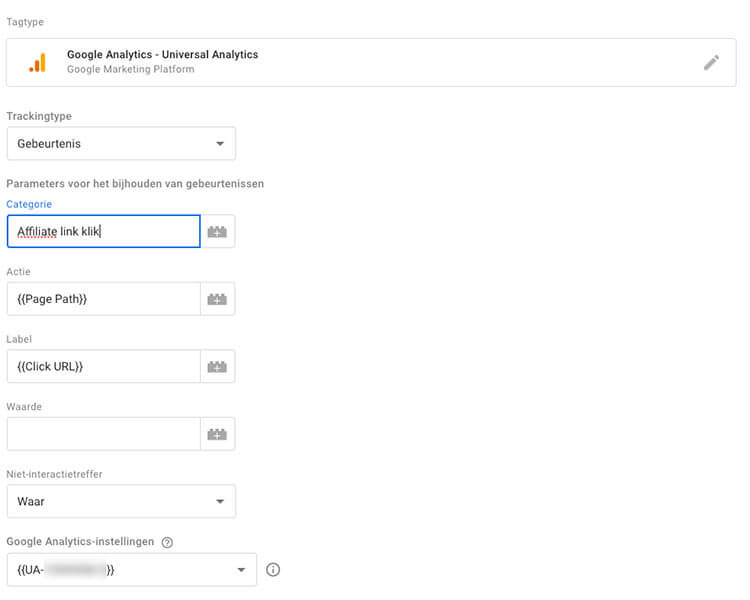
Step 8: Fill in the information below. (You may and can choose the name of the category. Make sure it is recognizable for the affiliate link but don't forget it. We will need it later for Google Analytics)
Category: Affiliate link click
Action: {{Page Path}}
Label: {{Click URL}}
Non-interaction hit: True
And under Google Analytics setting, choose your Google Analytics domain.
This, if you followed my blog on setting up Analytics via Tag Manager correctly, is your Google Analytics tracking code.
This always begins with UA-.
This will look like this:
Step 9: Then click on "Triggers" at the bottom of the page.
Step 10: Click the plus (+) sign in the upper right corner.
Step 11: Replace links 'Nameless trigger' with Affiliate link click. (Again, this name is up to you and should be made specific to the affiliate link. For convenience, I'm calling it Affiliate link click again now)
Step 12: Click on "Trigger Configuration.
Step 13: Click on 'Left only' under the heading 'Click'

Now you have to pay attention again.
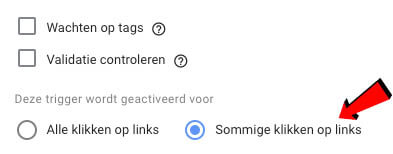
Step 14: Click on "Some clicks on links" instead of "All clicks on links.
Step 15: Change 'Click ID' to 'Click 'URL'
Step 16: Enter the affiliate link in the last open box

Step 17: Click "Save" in the upper right corner.
If all goes well, you are now back in the overview with the Tag configuration and Triggers.
Step 18: Click "Save" in the upper right corner again.
Google Tag Manager setup is complete.
Now we need to ship, test and correctly add the adjustments in Google Analytics.
A brief respite
If you made it to this point ... Chapeau!
You just clicked, uh, flicked that.
But we are not there yet, so we are moving on quickly.
Step 19: Click 'Submit' at the top right, then click 'Publish' and then 'Continue'.
Then you may now sing your favorite song very briefly.
Because that's what Google says.
And if Google says something, you do it.

Tag Manager: Check! On to Analytics
We have now made sure that clicks on affiliate links are measurable.
Consequently, these clicks are now reflected as events in Analytics.
To see if it works, you can open Google Analytics, click on the affiliate link, and in the meantime, see if anything happens within the "Events" heading under "Realtime.
We don't want the clicks on affiliate links as an event; we see those as conversions.
So that's what we're going to do now: turn the event into conversion.
Step 20: Login to Google Analytics and click the appropriate account.
Step 21: Click on the cog icon in the lower left corner
Step 22: Next, select the appropriate property and click on "Goals.
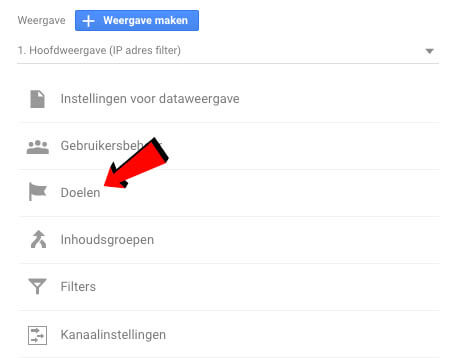
Step 23: Click on "New goal.
Step 24: Next, under Target Configuration, choose 'Custom' and click 'Continue'.
Step 25: In the name, enter the name of the affiliate link or, for example, the name of the affiliate party.
This is up to you, so again make sure you make it recognizable.
Step 26: In the Type row, click on "Event.
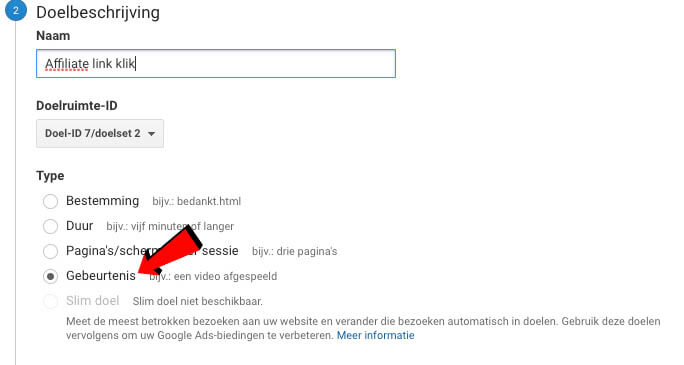
Step 30: Click "Continue.
Under "Category," enter the same category name you entered in step 8.
So that was with me: Affiliate link click
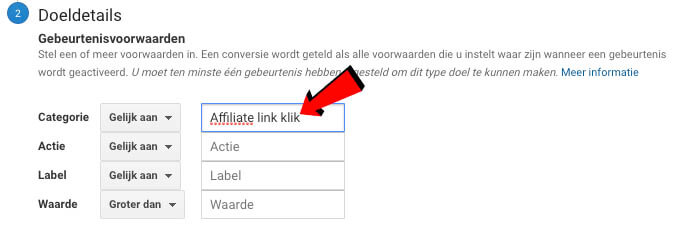
Step 31: Click "Save.
YES! That was it. Just need to test
If you believe in yourself and are confident that you have done everything right, you may now continue reading my other blogs (no, you may not leave the website).
If you still want to double-check that you've followed the steps correctly, you should click on "Conversions" under "Realtime" in Google Analytics.
Then when you click on the affiliate link within your website and you see a 1's pop up, you've done well and may eat cake.
Or some other treat, because that's what you have thickly earned.
If it didn't work out, then you can contact me (or go through the steps again, of course)!





Written by: Daniel Kuipers
Daniel is the founder of Online Marketing Agency. He constantly scours the Internet for the latest gadgets and tactics and blogs about them in understandable language. Well, sometimes.