Menu
Table of contents
Those calls to your company (through your website), we want to know ...
And measure!
After all, how valuable is it to know exactly where a caller is coming from?
For example, does the lead come in to the website through Google, LinkedIn, an ad or perhaps through a guest blog?
To find out, you can use call tracking.
Call tracking is nothing but measuring the incoming calls and in this article I will take you step by step through the installation of call tracking via Tag Manager
That way, you know exactly where your phone leads are coming from and which channel you need to focus more on.
Before we start: each sentence that has a number in front of it is a step you must go through if you want to measure telephone leads.
Call tracking starts with Google Tag Manager AND Google Analytics
Yes, I know.
Google Tag Manager, especially when you first open it, can be daunting.
But that is totally unnecessary.
Because if you can't figure it out, read the blog I wrote about installing Google Analytics via Google Tag Manager.
1. So that is step 1: read the article and perform those steps.
Adding variables and setting the trigger
This step is essential for call tracking, but is also immediately the most difficult step.
So, just pay attention and imitate what I did!
2. Click on "Variables" within the Workspace.
3. In the top block, click "Configure.
4. Make sure the box for 'Click URL' is checked.
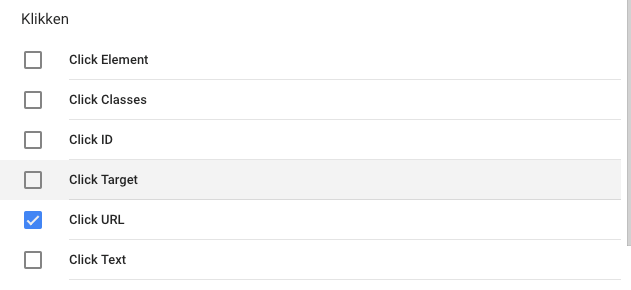
5. Click on the cross to the left next to 'Configure built-in variable' and then left on 'Triggers'
6. Click 'New' and replace 'Unnamed trigger' in the upper left corner with, for example: 'Call tracking trigger'.
7. Click on the block with 'Choose a trigger type to start setting' and then click on 'Clicks only' under the heading 'Click'.
8. Check 'Wait for tags' and 'Check validation' both.
9. Then fill in all the details exactly as you see in the screenshot below.
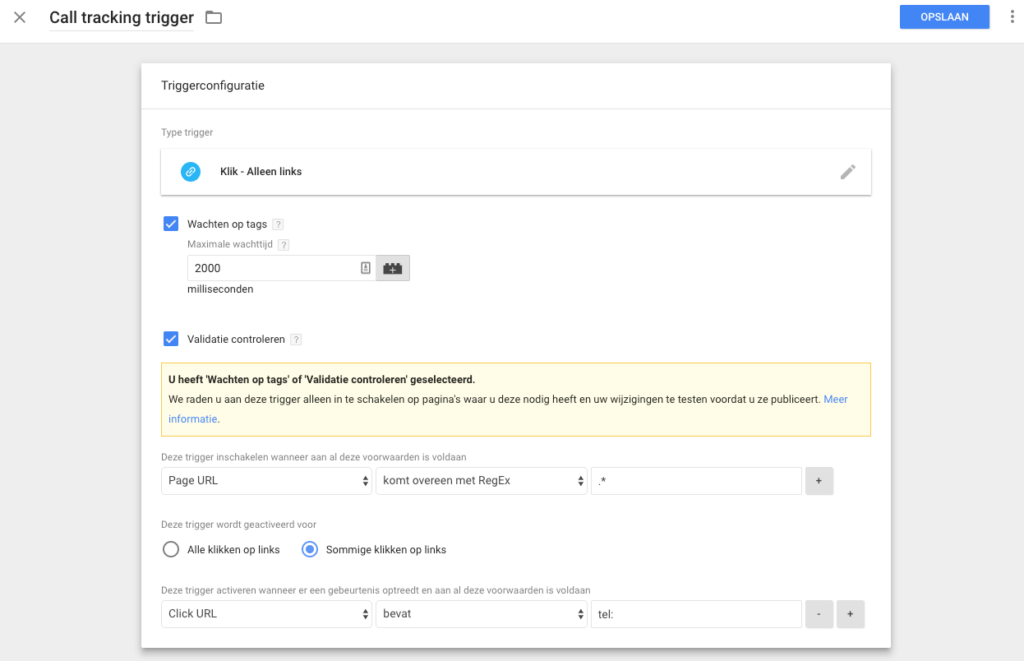
Just for the record:
- In the block after "Matches RegEx," enter: .*
- In the block after "Contains," enter: tel:
10. Click "Save" in the upper right corner.
The Trigger is ready, on to the Tag
We go right ahead!
11. Click "Tags" on the left, then "New.
12. Change "Nameless tag" in the upper left corner to "Phone number click.
13. Click 'Choose a tag type to start setup' and click in the row: Google Analytics - Universal Analytics.
This is the top one if all goes well.
Now you have to pay extreme attention again.
14. In the screen you now see, enter the data exactly as shown below.
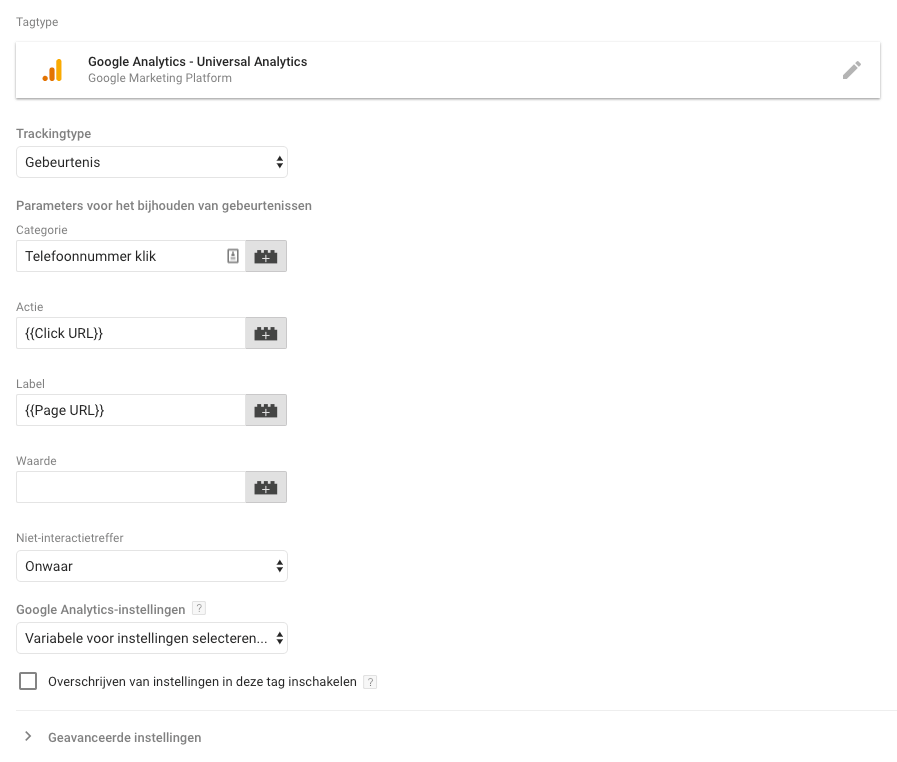
So:
Under category enter: Phone number click
Under Action enter: {{Click URL}}
Under Label enter: {{Page URL}}
At Google Analytics settings, click your Google Analytics variable.
15. If you are 100% sure you have entered the above information correctly, you may scroll down and click on "Choose a trigger to activate this tag.
16. There, if you went through the steps correctly, is the trigger called "Call tracking trigger.
You have to click on those!
Then your screen should then look like this:
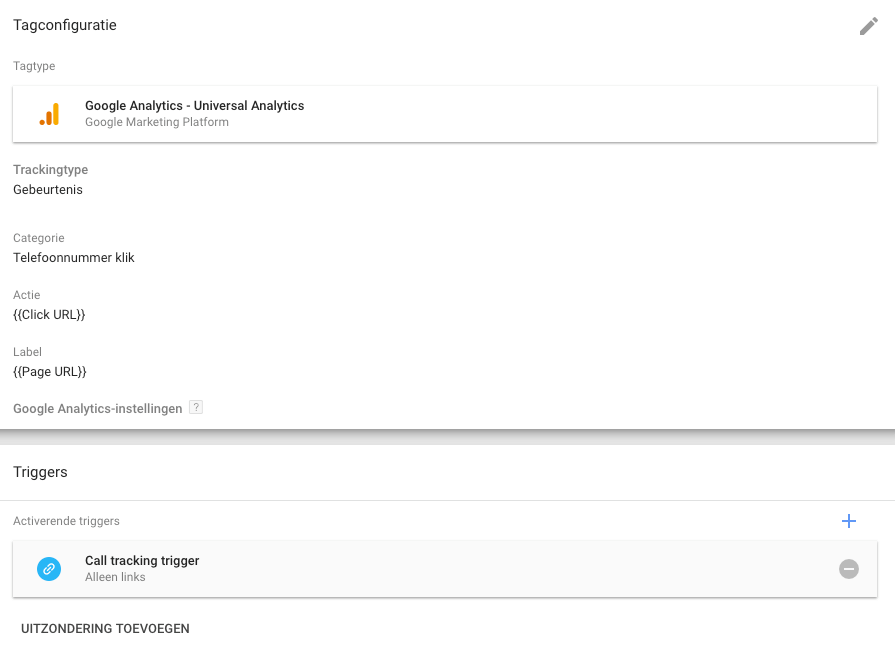
Just click 'Save' at the top right.
And then...
BAM!
Setting up call tracking using Google Tag Manager is that simple....
Just kidding, first we have some testing and shipping to do.
And then I'll briefly explain where you can see the data back in Analytics.
Testing and shipping
On to testing!
17. Within Google Tag Manager, click "Preview" in the upper right corner.
18. Open your website and if all goes well, an additional bar with Tag Manager will appear at the bottom.
Then you should see under "Tag Not Fired On This Page. Phone Number Click.
19. Then click on a phone number within your website and if "Phone Number Click" has moved to "Tags Fired On This Page" then you have completed the above steps correctly and can be proud of yourself.
20. Close your website screen, go back to Google Tag Manager and click 'Close preview mode' right below the orange bar.
21. Click "Submit" at the top right, then "Publish," then "Continue," then sing your favorite song (because that's what Google says).
Now I'm very curious what your favorite song is....

Oh, I'm getting distracted again.
Back to measuring telephone leads.
Now when you go to Google Analytics and click on "Events" under "Realtime" you can see, as the name implies, real-time clicks on phone numbers.
Don't you want to see them in real time?
Then click on "Events" under the "Behavior" heading.
But, now you (and I) don't want Analytics to see them as events, but as conversions.
Because they are, remember?
Conversions.
From events to conversions in Google Analytics
Fortunately, this was peaked in a few minutes.
So hang in there for a while longer!
22. Within Google Analytics, click "Administrator" at the bottom left.
23. In the rightmost row, click "Goals" and then "New Goal.
24. In the row you see, select the last option: 'Custom' and then click 'Continue'.
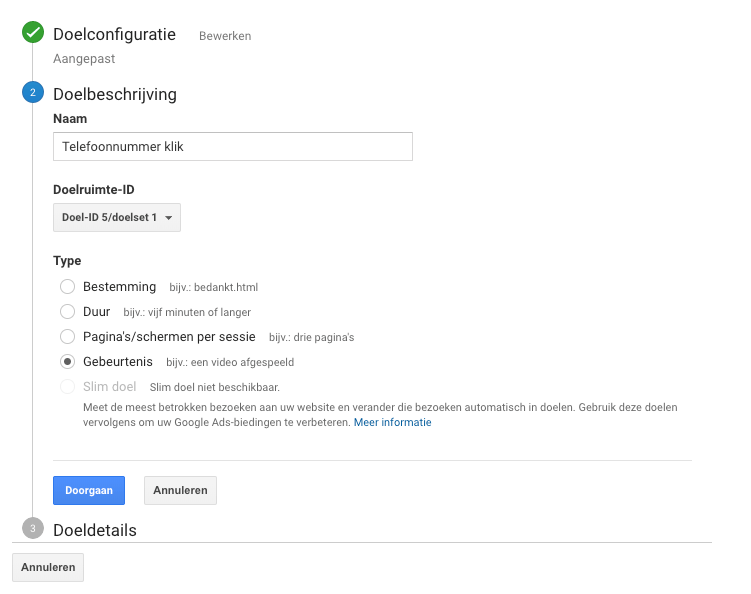
25.Under 'Name', enter: Phone number click, check 'Event' and click 'Continue'.
This then looks like this.
26. Under the 'Category' heading, enter 'Phone number click'.
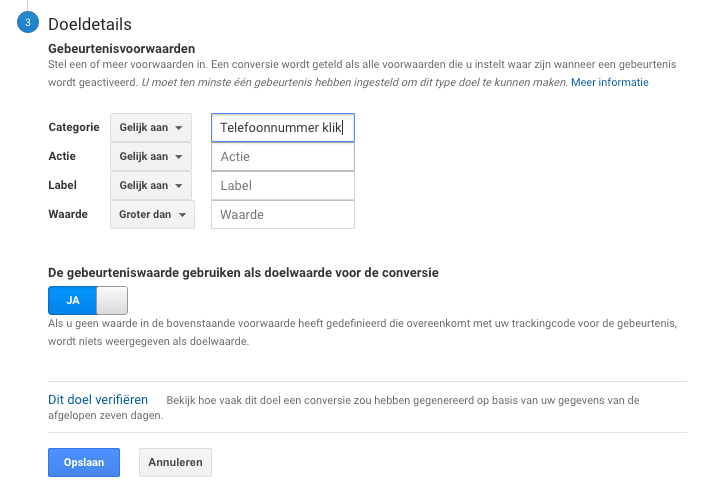
27. Click "Save.
28. Wait for people to click on your phone number so you can see it reflected in Analytics and enjoy your great performance.
I tried to explain setting up call tracking within Analytics with Tag Manager so clearly.
I hope you have succeeded.
Isn't it?
Then just click on this link and I'll do it for you :).





Written by: Daniel Kuipers
Daniel is the founder of Online Marketing Agency. He constantly scours the Internet for the latest gadgets and tactics and blogs about them in understandable language. Well, sometimes.