Menu
Table of contents
Analytics tracks the behavior of your visitors, shows where people leave your website and shows where people come from. It is an indispensable tool you should use to optimize your website.
The benefits of Google Analytics at a glance:
- You can see if your online marketing activities are resulting in more conversions (sales, downloads, etc.)
- You can see where visitors leave your website and where they get in
- You can learn more about your target audience (Interests, behavior, technology, etc.)
- You can see whether visitors visit your website from a phone or mobile.
In short: Google Analytics is a repulsive tool that you absolutely must use. And how to install Google Analytics on your website, I'm going to tell you now!
Step 1: Sign in to Google Analytics
First, we are going to create an account with Google Analytics.
Go to https://analytics.google.com and sign in with a Google account. Don't have a Google account yet? Then go to https://accounts.google.com/SignUp?hl=nl.
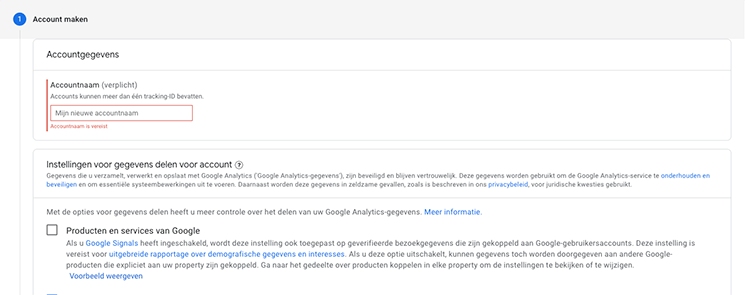
Then click on "sign up" on the right. You are now at the creation of a Google Analytics account. Fill in the following information correctly:
- Account name (For example, the name of the umbrella organization)
- Property (The name of the company and thus the name of the website)
- URL of website (This is the URL of your website. So in my case it is https://onlinemarketingagency.com)
- Time zone for reporting (Click here on Netherlands)
- Currency
- And then the industry category and company information

The next step depends on whether you chose Google Analytics, Google Analytics 4 or both. If you have chosen Google Analytics 4, you need to create a data stream first.
You can do that by clicking on "Web" and following the steps.

You have now created a Google Analytics account for your website and if all goes well you will now see a screen with important information: a tracking ID and a general site tag (in case of Google Analytics) and a Stream URL, name of stream and a measurement ID in case of Google Analytics 4. Leave this screen open because we will need this information later.
Step 2: Link Google Analytics with your WordPress website
There are several ways to link your website with your Google Analytics account. I am going to explain the 2 easiest and best ways. The easiest way is to download the appropriate plugin and put in here the tracking ID (from Google Analytics) or the measurement ID (from Google Analytics 4). You do this as follows:
- Go to the backend of your WordPress website. You do this by typing your URL into browser and putting /wp-admin after the url.
- Log in with the appropriate credentials and click on 'Plugins' on the left in the row
- Then at the top of the screen click on 'New plugin'
- At the bottom right, search for 'GA google analytics' and click 'install now' on the GA Google Analytics plugin
- Click activate
- Then click on "Google Analytics" on the left side of the row under "settings.
- Copy the tracking ID code and paste it to 'GA Property ID' under 'Plugin Settings'
- Check the next 2 checkboxes and click 'Save settings'
And it's that simple to add Google Analytics to your website. But now we want to make sure this is working. Checking your done is done as follows:
- Open your website in the browser
- Go back to your Analytics account and click 'Overview' on the left under 'Realtime'
If you see 1 or more active users on your site there then you know it's working!
Linking Google Analytics by inserting the generic sitetag script
Putting the sitetag script actually requires some knowledge. Nevertheless, I'm going to give you 2 ways how to do this. The easiest way is to ask your website builder to place this script. The script should be placed in the header right after the <head> tag.
The other way is a little trickier, yet I'm going to explain this way to you:
- In the back end of your WordPress website, click on 'Editor'. This falls under the heading 'Display'
- Find header.php on the right in the list and click here
- Copy the generic sitetag script and paste this script directly under the <head>
- Click on "Update File" at the bottom.
Et voilà. Linking Google Analytics with your WordPress is that simple. Be sure to check that the posted script works, though. If you can't figure it out, you can always ask your website builder to help out. If not, I'll be happy to help!
This article was written on Jan. 31, 2018 and updated on Aug. 22, 2021.


Written by: Daniel Kuipers
Daniel is the founder of Online Marketing Agency. He constantly scours the Internet for the latest gadgets and tactics and blogs about them in understandable language. Well, sometimes.