Menu
Table of contents
In that article, I also showed you how to turn on Site Search within WordPress. In this article, I'll show you how to do that within Shopify.
Step 1: Make sure the website is provided with Google Analytics / Google Analytics 4
The first step, of course, is to connect your website to Analytics. I recommend doing that through Tag Manager.
How to do that, I explain in the blogs below:
- Roadmap for installing Google Analytics via Google Tag Manager
- Tutorial: loading Google Analytics 4 (GA4) via Tag Manager
Step 2: Turn on Site Search within Google Analytics
For Google Analytics:
Go to Google Analytics, click "administrator" at the bottom left, then right click "data view settings.

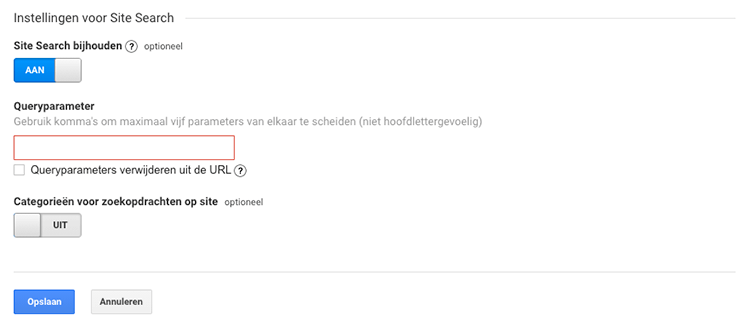
Scroll all the way to the bottom and set "Site Search" to "on.

For Google Analytics 4:
Site Search is on by default within Google Analytics 4. You basically don't need to do anything for that.
In case you are in doubt whether Site Search is on, you can find the option in the following way:
Go to Google Analytics, click on "administrator" at the bottom left, then right click on "data streams.

Click on the data stream and then click on the cog icon next to "Enhanced Measurement.

Make sure the slider is on at "Search the site.
Step 3: Take out the query parameters in Google Analytics
Whether you still have the "regular" Google Analytics or have already switched to Google Analytics 4, for both, you now know how to turn on site search.
You do need to take one additional action to use site search properly on your Shopify website. Namely, you need to exclude the query parameter in Analytics. The query parameter is what is in front of the keyword when you have searched.
And in almost all Shopify shops, that's the 'q'.
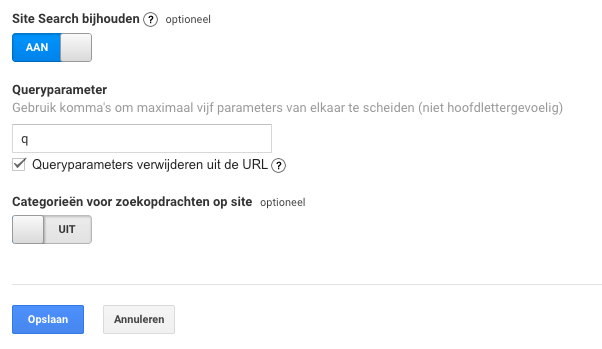
Within Google Analytics, you need to add the q as a query parameter and then also check the box with "remove query parameters from the URL.

Within Google Analytics 4, this query parameter is already excluded by default.
Now if you would like to know what you can do with Site Search, where to find it and what the benefits are, I recommend my blog
'Site Search: Easily track searches within your website' to read.


Written by: Daniel Kuipers
Daniel is the founder of Online Marketing Agency. He constantly scours the Internet for the latest gadgets and tactics and blogs about them in understandable language. Well, sometimes.